• RSS
  • Facebook
  • Pinterest
  • Twitter
  • Google+
Showing posts with label crafts. Show all posts
Posted by Maxine Cleminson - - 11 comments

The Big One is turning 8 next month and has asked for a Lego Party so I am trying to get ahead of the game and prepare some stuff while we have a weekend at home. So I have been making party favor bags in the shape of Lego bricks... super easy and very effective. I thought I'd share the printable resource I made to make it even easier for you guys!


You will need...

  • Paper party favor bags in bold 'Lego' colours - approximately 8.5" tall x 5.5" wide
  • The Lego studs printable below in matching colors
  • Scissors
  • Glue


Firstly, you will need to print the Lego studs to match your paper bags (see the printable at the bottom of the page). I chose yellow, orange, light green and light blue in a slight departure from the royal blue, red and yellow palette so synonymous with the Lego brand, but I have included printables in a variety of colours and even blank ones to allow you to print onto your own colored paper to match your theme.  My bags were from Target and were cheap and are well made.  You can buy similar online from suppliers such as Party City or Oriental Trading.  You could also use paper lunch sacks or treat boxes in bright colours.  Click on the pictures below for similar bags available from Amazon.


Carefully cut out the circles using a sharp pair of scissors. Glue the circles onto the front of the bag using a glue stick. Line up the 'studs' with approximately 1/2-2/3" between them.


Done.


Click on the thumbnail below to open the printable PDF file.  The document contains all the colors you might need, plus a black & white outline one in case you choose to print on colored paper.


[ Read More ]

Posted by Maxine Cleminson - - 2 comments

I am frequently looking for ways to brighten our home and add some colour without spending a fortune and I have blogged about this before a number of times. We live in a rented house, so it's not like we can decorate the walls directly and there is a LOT of beige in our home (much to my distaste)! So I have found that a good solution is to put up large colourful items as 'wall art' (sounds a little pretentious, but it's not, honestly!).

I have done this successfully in our master bedroom, where I created a large 'canvas' to match our bedding by repainting some old fabric and stapling it around a wooden frame. I've also put up rugs on the wall to create large scale wall decor on a budget. This last example was for my son's new cowboy themed bedroom (which, I am happy to report, he loves). It was while shopping in a Texas souvenir gift shop for a cowboy-boot shaped money box for his shelf (sad, I know) that I saw a tea towel with a Wild West themed map of Texas on it. I purchased it on a whim and am glad I did so, because it has made a great canvas wall art addition to his new bedroom.

I had intended to buy some wood and create a canvas stretcher frame, but this requires tools I would have had to borrow, so I had been putting it off.  I have done this before and it is quite straightforward and low cost to do, but you will need a few tools to cut & join the pieces of wood together.  There's a good tutorial on how to do this here.

But then I had an(other) idea in the grocery store while picking up some air conditioning filters... these are sturdy yet lightweight, relatively cheap and easy to come by (at least here in Texas where air con is standard!).  But mostly, they are the perfect solution to creating a stretched canvas piece of wall art.


You will need...
  • a piece of fabric you like ... this could be an offcut, a silk scarf, a coordinating pillowcase to match your bedding, a themed tea towel or dish towel or whatever takes your fancy!
  • a 1" thick air conditioning filter that is at least 2" smaller than your fabric all the way around, for example, my tea towel measured 22"x23" so I bought a 20"x20" filter
  • a strong adhesive or staple gun... I used a hot glue gun
  • white paint, white out, white paper or stickers ... I used white address label stickers
  • a soda can ring pull
  • an iron


Firstly, it's a good idea to iron your fabric before starting to make sure there are no unsightly wrinkles or creases on display.


If your fabric is pale, like mine, you will need to cover any writing on your air filter as this may show through. I used white adhesive address labels, but you could use white paint or glue on white paper.


Then, place your fabric over your frame.  Play around with the position until it suits your needs... this is less important with abstract prints, but was very important for my dish towel as I wanted the map central with an even border.  Once positioned, place a dab of glue in the center of one of the long edges and press the fabric to affix.  Pull the fabric taut and repeat on the opposite side, and then again on the other two edges.  Don't pull the fabric too taut though, as the frame is only made of cardboard and may warp out of shape.... you are just aiming for it to not be baggy!


Next, place another dab of glue about an inch or two from one of the corners and gently pull the fabric into place as before and stick it down.  Working on alternate corners, repeat this another 7 times (once on either side of each of the four corners).


Then flip the filter over so the fabric is face down.  You should then place a bead of glue along the edge, leaving the corner.  Gently, wrap the fabric from the front around to the back and press into place.  Repeat for the other 3 edges, until just the corners are left open.  Fold the corners as neatly as possible and glue into place.


Finally, create a hanger for your wall canvas by gluing a soda can ring pull just below the center point of the top edge on the back.


Once your glue is fully dry, your canvas is ready to hang!


If you don't have a hot glue gun or a strong adhesive, you could use a staple gun instead! This whole project cost me about $11 ... $5 for the dish towel & $6 for the filter!  And I think it looks pretty effective, so I'm now on the lookout for some funky fabric to create more!  Remember though, tea towels work brilliantly for this purpose and you can get some that are literally works of art!  Just a quick search turned up the following, all costing less than $15:

From the Museum of Fine Arts, Boston, a reproduction of Paternosto's 1965, Staccato.


Or the iconic Collection du Chat Noir, 1898 Steinlen.


From the Tate Museum, London, Edvard Munch's Starry Night.


Finally, for those of you loving the Texas theme (and why the heck ain't that y'all!?)... I've managed to track down the exact same tea towel I bought in the local gift store, online... good old Amazon! They even do a 52" square tablecloth version, but I'm not sure you'd get a filter that big! :-) Click on the links below for more information!

[ Read More ]

Posted by Mama Max - - 3 comments

The Big One has been Star Wars mad since the tender age of 3 and a half when Him Indoors & I were exhausted with newborn twins and looking for a movie to occupy our eldest whilst we got a well-deserved sit down on the sofa!  A quick flick through our DVD collection yielded 'Star Wars Episode IV: A New Hope'... and (as they say) the rest is history!  A few short months later the obsession had progressed so much that the Big One asked for a Star Wars themed 4th birthday party!  Pinatas were a relatively new arrival to the party scene in the UK so I decided to make my own.  Surprisingly, they are very easy to make and you can even adapt them (as I did) to be more suitable for pre-schoolers with a pull-string to open them rather than the potentially dangerous blindfolded stick-busting more common with pinatas stateside!  I was really pleased with the way my R2D2 pinata turned out and have been meaning to post about it for a while... however, as this is from the archives of my pre-blogging days I don't have photos to show you how I made it (sorry)!  So, I have taken the time to draw instructions in a step-by-step guide which also includes the printable decorations I made for mine... if you scroll to the bottom of the post there is a link to a .pdf file that contains everything in one easy to print guide (please note that I am sharing this for personal use only)!


You will need..
  • 1 x round balloon
  • 2 x long thin modelling balloons
  • 2 x large sheets of poster paper or card
  • Sticky tape
  • Scissors
  • Two small card boxes
  • Newspaper cut into strips
  • Craft glue
  • Pipe cleaner or wire coat hanger
  • White paint & paintbrush
  • White crepe paper
  • Silver crepe paper
  • Black crepe paper
  • Curling gift ribbon
  • Candy/treats
  • Empty plastic bottle cap
  • Printouts from these instructions
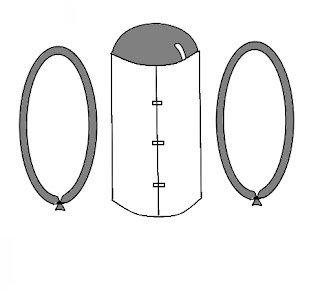
Step 1:  Inflate a balloon and wrap a large sheet of poster paper (approximately 18" high, although judge the size in relation to your balloon) around it, leaving just a dome at the top.  Secure with sticky tape to make a cylinder with a dome at the top ... like R2D2's body.


Step 2:  Inflate two long modelling balloons until they are approximately twice the height of the cylinder long, and then tie the ends together to make two large loops.


Step 3:  Carefully squash the loop of balloons into R2D2 leg shapes and fix onto either side of the body with tape (you may have to use strips of paper taped to the body if the tape makes your balloons pop!).


Step 4:  Make R2D2's feet from two small cardboard boxes and tape into place over the bottom of the legs.


Step 5:  Paste strips of overlapping newspaper all over the balloons and body with a mix of craft glue and water to make papier mache.  Allow to dry completely (usually overnight).


Step 6:  Once the papier mache is dry you can pop the balloons inside with a pin if you like.  Use a pipe cleaner or wire coat hanger to create a hook in the top.  Then paint the entire thing white to stop the newsprint showing through.  Allow to dry.

Step 7:  At this point the base of the cylinder (R2D2's body) will still be open.  Using a ruler, measure the diameter of this hole.  Then cut a circle from another piece of poster paper or card that has a diameter 2 inches bigger than that hole.


Step 8:  Cut a trap door in the center of the card circle by making cuts on 3 sides of a square approximately 3"x3".  Bend on the 4th (uncut) side to create a door.  Then make 1" cuts all the way around the edge of the circle to create a fringe.  Put the circle of card over the hole on R2D2's base and bend the cut fringe up and over the edge before taping or gluing in place.  


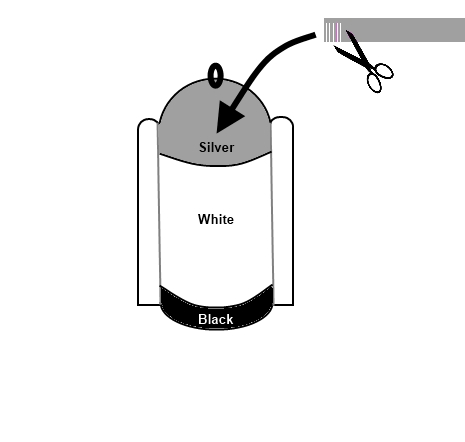
Step 9:  Now to decorate R2D2, you will need to cut strips of crepe paper approximately 2" thick and make cuts to create a fringe.  Layer these fringes of crepe paper starting at the bottom and working towards the top.  Put a layer of black fringing on the bottom of the cylinder to create the impression of a gap underneath R2D2's body.  Then white fringing all over the body & legs.  Finally, silver or grey fringing over the dome of his head.


Step 10:  Turn R2D2 onto his back.  Cut a length of curling ribbon and attach securely to the edge of the trap door... this is the only string that will win and open the pinata!  You then need to create easily removed 'decoys'!  Cut more lengths of ribbon and glue or tape loosely in place along the edge of the feet.


Step 11:  Open the trap door and fill the interior with individually wrapped candies and small treats ... be careful to keep the weight realistic!  Push the trap door shut, but do not glue or tape shut.


Step 12:  Trace the shape of the base onto a sheet of the black crepe paper and cut out.  Stick the sheet of black paper over the base to conceal the decoy ribbons and trap door and to help the trap door stay shut (but not too resistant to opening!).


Step 13:  Finally, decorate the outside of R2D2 by cutting out the shapes on the printable below.  You can also use an empty plastic bottle cap to glue on for R2D2's camera (see the photo below to see what I mean)!


Step 14:  Hang R2D2 by the hook on the top and then at the party, the kids can take turns to pull one of the strings until the lucky winner pulls the one attached to the trap door!  If you would rather make this a traditional pinata that needs busting open with a stick, just don't bother cutting the trap door or attaching the ribbons to the base!


Click on the preview image below to open the printable instructions and cut-outs...


Enjoy... and may the force be with you!


[ Read More ]

Related Posts Plugin for WordPress, Blogger...