• RSS
  • Facebook
  • Pinterest
  • Twitter
  • Google+
Posted by Maxine Cleminson - - 0 comments

[ Read More ]

Posted by Mama Max - - 0 comments


I am very excited to announce my latest project ... an e-book that I have been writing over the year and that is due to be published on Amazon in the next month or so (see the email signup sheet at the bottom of this page if you want to be notified when it's published)! The title is a bit of a giveaway, but I'll give you the lowdown anyway!

Him Indoors, the kids and I left our quiet, leafy village in Berkshire in April 2010 and made the very daunting step of moving to a new country. As first-timers to the expat lifestyle, we really didn't know what to expect and it was a nerve-wracking experience in many aspects. Understandably, my husband's immediate concerns were starting his new job; after all, his acceptance of the new role was the reason why we had uprooted our family and moved 6,000 miles to Texas, and I think he felt a huge responsibility to us to make it a success. Consequently, that left the management of the 'domestic' stuff up to me and it was a little overwhelming.

I have always been a born organiser and I love project managing things; our D.I.Y. wedding was a great example of this and I endured a lot of good-natured jesting from Him Indoors about the elaborate spreadsheet tracker I set up to keep tabs on all the details (this was back-in-the-day before Pinterest)!!! I attempted to manage the relocation process in the same way, and was somewhat successful.


The difficulty with moving abroad is that even the smallest differences can throw you out of your comfort zone, and even though the USA shares a lot of cultural & lifestyle similarities with Britain, especially compared to locations in Africa or Asia, the small differences can add up to a confusing and stressful situation.

When we moved, the twins were 17 months old, and the Big One had just turned 5. My biggest concern was maintaining a sense of normality wherever possible... kids are very adaptable but I just wanted to make it as easy as possible for their sake. One of the issues I faced (and still do) is that my boys are quite fussy eaters. They know what they like, and are happiest when we stick to the familiar. When we had been on holiday before, the boys had virtually stopped eating for the whole week. So, I was understandably worried about what food choices there would be and how they would adapt.

I turned to the Internet for some research, assuming that the supermarkets in Texas would have online shopping sites in the same way that Tesco's and Waitrose did in the UK. No such luck. I tried a few expat forums, but invariably, the discussions centered around how to find British food favourites in America!

So, we arrived in the States with no idea about what we would be able to buy in the grocery stores. It may seem a little dramatic to have worried about such a thing in the light of everything else going on, but as a mother, the ability to feed your children well becomes a bit of an obsession!

My first grocery shopping trip occurred the evening that we landed in the States. I had been awake for over 24 hours, was hot & sweaty (having left a chilly England wrapped up warm and arriving in the blazing heat of Texas) and really just needed to crash. However, I braved the supermarket to get some basics so that I could at least give the boys breakfast when they awoke in the early hours with jetlag! The supermarket felt very alien and what would have taken me 15 minutes in the UK (all I wanted was the basics) took almost an hour! Even the checkout process was different and confusing. It's almost laughable now how stressful I found the situation, because if I had been travelling on my own without the kids or if it had just been a holiday I wouldn't have cared at all. But it was strange knowing that this was going to be my new reality... and at that particular time, it didn't feel very real!


A few days later, I braved the supermarket again to do a 'big shop'. Thankfully, I had my Mum with me (who had traveled with us to help with the kids), but it still took 4-hours of dithering and stressing!

Almost three years on, grocery shopping is a routine chore, much in the same way it was in the UK. However, there are still times when I can't find something I need in the supermarket and have to try to explain to a confused American what I mean by 'marzipan'. Furthermore, in those years I feel I have gained enough insight to be able to share with others some of the key things you might want to know as a British expat shopping in America.

The e-book is designed to be a detailed source of information to ease the worries of an expat prior to their move to the USA. However, it is also designed to be used as a reference book for those occasions when you need to find something (like marzipan!) and haven't got a clue where to start!

The e-book includes the following:

  • a section on where & how to shop, coupons, trolleys, bags, weights & measures and more...
  • a load of information about food additives used in America and how to avoid them
  • detailed chapters on the main food groups; vegetables & fruit, dairy, meat, fish, canned goods, grains, condiments, drinks, candy etc... with translations, recommendations and alternatives to your favourite UK brands
  • a chapter specifically addressing baby & toddler food with comparisons to UK brands and recommendations for similar US alternatives
  • information on shopping for people with allergies and food intolerances
  • some details about household & cleaning supplies, including laundry products
  • a chapter about food shopping for Christmas and other holidays
  • a list of sources of British foodstuffs you can't live without and some suggested substitutions when you can't get the things you need
  • a clickable index so that you can use the book as a ready reference guide

Finally, I have also included some printable shopping lists to ease the transition from the UK to the US.  One is to take with you on your first shop to get the basics... a list of suggested basics so you can survive your first few days!  The other is a more detailed list that will help you recreate your UK store cupboard once you are settled here in the states.


If you are keen to be notified when the book is released, simply enter your email address in the form below. I will send you a confirmation email and then when the book is released I will send you a notification.


* Required Free Contact Form
[ Read More ]

Posted by Mama Max - - 0 comments

A while ago, I blogged an idea for storing necklaces using shower curtain hooks.  It was only as I was writing that blog entry and adding the photos that I got a little embarrassed about the state of the shelf above my neatly organised necklaces.  There was makeup items strewn all over the place.  Let's face it, ladies... makeup is a pain to store at the best of times.  I've given up using a makeup bag (except when travelling) as they always end up a bit yucky inside... it only takes a top to come off a kohl pencil or an eyeshadow case to open and the whole thing is a powdery, icky mess.  But at the same time, it's a bit of an eyesore to have it all strewn over the bathroom (or closet) counter.  So I was totally inspired by an idea documented on a blog called Laura Thoughts.  She used a picture frame with a sheet of metal to create a magnetic display for her makeup.  Fabulous and very creative.  So I decided to use her idea, but to use recycled bits to create my own.


You will need...


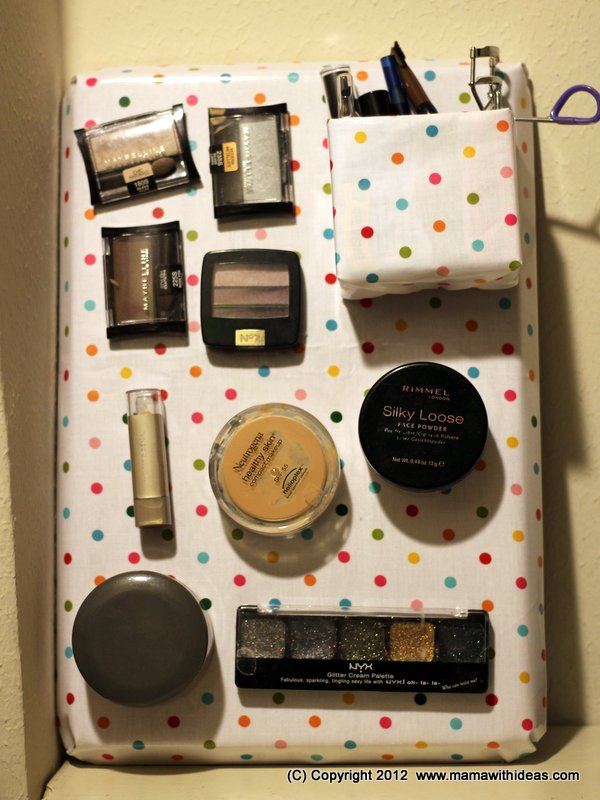
Cut a piece of fabric a few inches wider than your cookie tray all the way around.  Place the cookie tray on the wrong side of the fabric and fold the fabric up and over the sides of the tray.  Glue into place, making neat folds at the corners.  Turn the tray over and you have a pretty magnetic board!


Cut strips of magnetic tape, and glue to the back of your makeup items.  The heavier the item, the more magnetic tape you will need.  The items can then be put on the tray.


Cut a small box to the right size to store your smaller items such as mascaras, kohl pencils etc...  Wrap it in some more of the fabric and glue in place, neatening the edges.  Attach more magnetic strips to the back of the box and attach to the board.


You can either prop the board up on your bathroom counter or closet shelf, or hang on the wall next to your mirror.  All the items you need are easily visible and obtainable, and kept out of the way!  Easy peasy, and only 20 minutes to make!


[ Read More ]

Posted by Mama Max - - 0 comments


I have been on a diet for the last couple of months in an attempt to shift some of the weight I've gained since my overactive thyroid function was 'fixed'.  Whilst Graves' Disease is no laughing matter, it did have the rather delicious side-effect of allowing me to get away with massively overeating without gaining a pound!  If it weren't for all the other nasty side effects it would have been brilliant!  I am now thankfully in remission and have normal thyroid levels which is fantastic... the only problem is that my body is still used to consuming far more calories than I actually need, so I have seen the weight pile on.  However, I decided a couple of months ago that something needed doing so I began a diet... I've lost about 12 of the 20lbs I am aiming to shift, and it's been a bit of a slog if I'm honest.  Nothing dramatic, fancy, potentially dangerous (or expensive)... I've simply reduced my calorie intake to about 1350 a day, eating more nutrient dense food (no empty calories for me) and increased the amount of exercise I am doing.  Booooorrrring.  But there really isn't any quick or easy fix.


But maintaining such a saintly routine is hard work... I'm a strong adherent to the old adage "everything in moderation, including moderation!", because let's face it, there are times when a healthy apple just ain't gonna cut it!  So, I was really pleased when a recent culinary experiment turned out so well!  It made a healthy, nutrient-dense, low calorie treat that was also flippin' delicious!!!!  Whodathunkit!!?


The key to this dessert/treat is having over-ripe bananas.  This makes it doubly brilliant as my kids won't eat brown bananas and I hate to throw them out!  I've blogged before about how brilliant bananas are so you might've guessed I'm a fan!  Oh, and another bonus for those with dairy intolerances (or high cholesterol)... this is a vegan recipe and so is completely dairy free!!!


BANANA CHOCOLATE ICE CREAM (serves 4)

You will need...

  • 3 medium sized bananas, very ripe
  • 1.5 tablespoons of honey (you can use more or less to suit your taste)
  • 3 tablespoons of unsweetened cocoa powder
  • A food processor

Firstly, peel and slice your bananas and spread out on a lined cookie sheet.  Pop the sheet in the freezer overnight so that the banana slices have a chance to get solid.


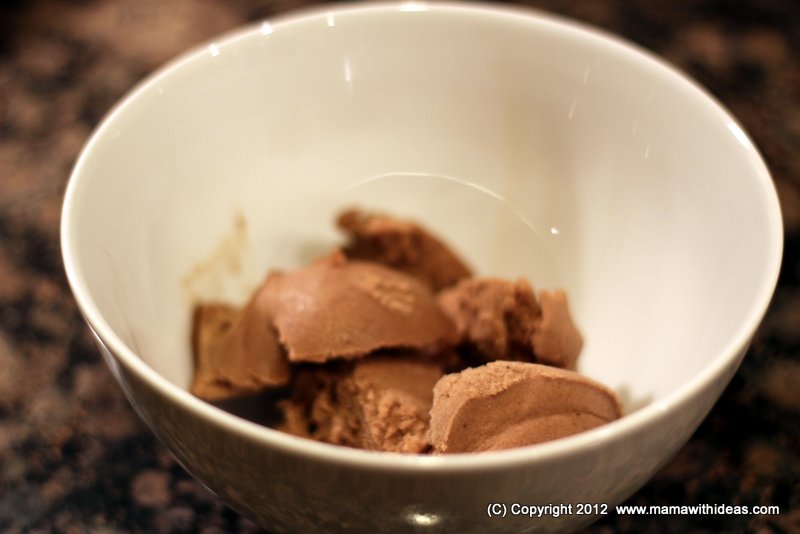
Put the frozen banana slices in the food processor and set it running.  At first, it will look very lumpy and grainy, but persevere until you end up with a smooth soft ice-cream-like consistency.  Add the honey and cocoa powder and process some more until completely incorporated.  Taste and adjust flavours as necessary.


Pour the soft banana mush into a freezer-proof container, label and return to the freezer to re-harden.


After a few hours (or overnight), the consistency will turn into an ice-cream-like consistency and you can use an ice cream scoop to serve.  Perfect on it's own, or in a wafer cone with some chopped nuts & chocolate sprinkles for a special treat!


This makes enough for 4 servings, but you can scale the recipe up or down depending on the number of bananas you have!


And here's the nutrition information in case you are counting calories like me!!


[ Read More ]

Posted by Mama Max - - 9 comments


Silent Sunday


[ Read More ]

Posted by Mama Max - - 2 comments

Another Halloween is fast approaching, and the Big One has come up trumps again with another costume request that initially confused me.  Last year he wanted to be the Lego Ninjago master Sensei Wu and after a bit of investigating, I was able to make a costume for him, much to his delight.  This year, he asked to be Ash Ketchum.  I initially wondered why the dickens he wanted to go as the former husband of Demi Moore, until I realised that I was getting confused with Ashton Kutcher... an easy mistake to make if you are not up to date with the fads and obsessions of your average 7 year old!  Ash Ketchum is of course the main protagonist of the popular Pokemon series of manga/anime cartoons and all the related card games/merchandise that has become the Big One's raison d'etre.  He's also the 'trainer' of the iconic Pikachu  pokemon character.

So this year's costume has been coming together over the last few weeks.  You can actually buy Ash Ketchum costumes (unlike the Sensei Wu dude from last year), but as with a lot of these things, they are quite expensive and often "one trick ponies". I like the idea of adapting 'normal' clothes into costumes so that the kids can get some wear out of them.  The Big One's school has also changed it's policy for Halloween costumes, requiring that the children change into their costumes at school rather than go in already dressed up.  With fiddly fastenings I figured this was a recipe for disaster.  Plus, as a 'normal' 10-year old boy, Ash Ketchum's clothes are relatively straightforward as a costume goes.  Blue jeans, black-t-shirt, white/blue shirt, sneakers, baseball cap & fingerless gloves!  All quite easy.  So really, it's just a case of getting the details right to pull the outfit together.  I've detailed all of the parts of the costume that I purchased below... but I thought I'd also include a quick tutorial on how to make your own Pokeball... one of the key accessories to making this costume work.  You can buy Pokeballs, but they were about $10-15 for a 2.5" diameter foam ball ... and I just couldn't bring myself to spend that sort of money on it when they are so easy to make!


You will need...
  • A red ball, plastic or foam, approximately 2-3" in diameter.  I used one that came from a ball pit set.
  • White acrylic paint, or nail polish, or gloss paint.
  • Paintbrush
  • Black craft foam or paper
  • A white plastic bread tag (or more craft foam)
  • Scissors
  • Glue

Firstly, paint half the sphere of your ball white (you could use a white ball and red paint if you preferred).  Allow to dry, and apply another coat if necessary.


Cut a strip of black craft foam about 1/2" thick and glue around the middle of the ball, over the top of the edge of the paint.  Leave a gap of approximately 1" where the ends meet.


Cut a circle of black craft foam 1" in diameter and glue into the gap.


Using an old bread tag (or some white craft foam), cut a circle using a penny as a template.  Glue onto the black circle.  It's as easy as that!


Once you have your pokeball made, it's just a case of putting the other details together to get the Ash Ketchum look!


I managed to buy the cap and gloves as a set on Ebay for about $20.  These were perfect and added a level of authenticity to the costume.


A black short haired wig was also required to turn my blonde Big One into a convincing Ash Ketchum.  The spiky boy's punk wig below was perfect to achieve the manga look!  Click on the image for more details.


Then, instead of the blue/white bowling style shirt, I simply paired a plain white short-sleeved shirt with a blue fleece gilet.  I lightly attached some yellow ribbon (with easily removeable running stitches) to trim the bottom and pockets.  The gilet was from Land's End and once Halloween is over, I'll simply remove the yellow ribbon and he'll be able to wear it on the occasional chilly days we have here in Texas!


Finally, Ash Ketchum wouldn't be complete without his special Pokemon, the iconic Pikachu.  We bought this plush character on Amazon to finish the outfit off.  Click on the picture for more details.


The outfit is ready and waiting to go now and I'll update this post with a picture of the ensemble after Halloween! Happy track-or-treating!!!


Update: The full ensemble for Halloween!!

[ Read More ]

Related Posts Plugin for WordPress, Blogger...