• RSS
  • Facebook
  • Pinterest
  • Twitter
  • Google+
Showing posts with label British. Show all posts
Posted by Maxine Cleminson - - 0 comments


While this series is aimed at explaining the US medical care system to expats, I am going to start by giving a brief overview of the government funded insurance programs that exist to support US citizens and legal permanent residents with low incomes. The reason for this is that I was utterly bamboozled by the names being bandied around when I first encountered a healthcare provider in America and so I think it is helpful to get the broader picture.

Back in 2010 when we were relocating to the US from the UK, one of our 18 month old twins ended up with a high fever on the flight from London Heathrow to Houston. Talk about bad timing! A few days later and he had developed a blotchy rash across his torso and I was starting to worry. In the UK, I would probably have called the nurse at our local GPs office for some reassurance, but in an unfamiliar environment and without a regular medical provider I panicked a bit. We called my husband's employer who put us in touch with our employer-sponsored medical insurer to find out what to do... at this point they hadn't even issued us with our policy details! Thankfully, they emailed me details of a paediatrician not too far from our temporary accommodation and I took the Shouty One to get checked out.

This was my first encounter with the forms you have to complete when visiting a healthcare provider in the US. I was surprised they didn't want to know my inseam length and favourite colour on top of all the other information!!! Unfortunately, being in the country for less than 3 days I was still jet lagged and had no idea what most of the questions were about. I didn't have a permanent address, US telephone number and had no idea what SSN# and DL# stood for (social security number and driving licence number, not that I had obtained either at the time)! And I must have looked like a right prat when I asked the receptionist whether she knew if I had Medicaid?

So, even though it probably doesn't apply to most of you reading this article, I AM going to give a quick summary of all types of insurance, including those funded by state and federal government for some US citizens!

NOTE: A glossary of terms is at the bottom of this post.

Another caveat: please remember that this is a high-level overview.  Check the details of your own medical policy carefully as every one is different and specific things may or may not be covered by your own policy.

A - MEDICAID, CHIPS, MEDICARE & MEDIGAP...


Medicaid is a means-tested federal and state funded insurance program. It was expanded in 2010 by the Affordable Care Act (nicknamed "Obamacare") to include individuals and families with incomes under 133% of the poverty threshold. In 2011, this was $29,700 annual income for a family of four. Medicaid beneficiaries receive free treatment for a limited number of healthcare services, but in some states people are required to pay a small co-payment (a set fee collected at time of treatment by the healthcare provider).

CHIPS (Children's Health Insurance Programs) is a supplementary program that provides healthcare to uninsured children under the age of 19 who come from low-income families that don't qualify for Medicaid.

Medicare is also a means-tested state funded plan but it's aim is to assist low-income individuals over the age of 65 and people that are disabled and unable to work. It provides Hospital Insurance (part A) for eligible individuals and covers limited costs incurred by patients requiring hospitalisation as an in-patient... assuming they paid FICA tax (similar to National Insurance contributions in UK) for at least 10 years. Additional coverage must be paid for by the individual if they need Medical Insurance (Part B), e.g. to see a doctor/GP. Further coverage can be purchased to cover extra costs (Part C) & prescriptions (Part D).

Medigap insurance is private insurance that can be purchased by individuals to supplement Medicare.


B - Private Medical Insurance


60% of people in the US participate in an employer sponsored health insurance scheme. This type of insurance is paid for in whole, or in part, by businesses on behalf of their employees as part of an employee benefit package. Although workers are effectively paid less than they would be (because of the cost of insurance premiums to the employer), this type of insurance offers several benefits to workers, notably economies of scale, whereby they qualify for group discounts.

Only 9% of people in the US have individual health insurance that they have purchased directly from the insurer. In this case, the individual pays the entire premium without benefit of an employer contribution. In general, overall out-of-pocket costs for these types of plans are higher than employer-sponsored schemes.

There are many different types of policies, both employer-sponsored and individually purchased.  Below is a summary of some of the common types:

1.  Traditional Indemnity (sometimes called Private Fee-For-Service, PFFS)
This is the most basic type of healthcare insurance available, whereby beneficiaries pay a monthly premium and can submit receipts for their medical expenses to their insurer for re-imbursement, as long as they are services specifically covered by the policy.


2.  HMO (Health Maintenance Organization)
HMOs were historically called pre-paid Health Plans and are still sometimes referred to as these. Key features of an HMO plan:

- Patients are required to choose a primary care physician (PCP), like a GP in the UK. Women can select to have an OB/GYN as their PCP. The PCP will take care of most of an individuals healthcare needs.

- If the individual needs to see a specialist, they must obtain a referral from their PCP first. HMO policies also require beneficiaries to only see approved (in-network) health care providers.

- Expenses usually include the monthly insurance premiums and co-payments (a fixed dollar amount paid every time an individual sees a physician or buys a prescription). The co-payment is paid at the time of service directly to the provider and no further payments required.  This is particularly beneficial to expectant mothers whose policy covers maternity services.  They often only have to pay a co-pay at their first doctors visit and then all subsequent care during the pregnancy is covered.

- HMOs often provide preventive care for a lower co-pay or for free, in order to keep members from developing a preventable condition that would require a great deal of medical services, e.g. immunisations, well-baby checkups, mammograms etc...

- Experimental treatments and elective services that are not medically necessary (such as elective plastic surgery) are almost never covered.


3.  Preferred Provider Organization (PPO)
In the case of a PPO policy, enrollees are encouraged to seek healthcare services from certain 'preferred' healthcare providers that have a negotiated discount with the insurance company.  Key features:

- Patients have greater flexibility.  They do not have to enroll with a Primary Care Physician and do not require a referral from a PCP in order to see a specialist.  They can chose to visit ANY healthcare provider they like rather than just those on an approved list.

- Most PPO policies have a deductible. This is the amount of expenses that must be paid out of pocket before an insurer will pay any expenses. In the UK this is called an excess. Deductibles are typically used to deter enrollees claiming for trivial items. Policy holders are required to pay 100% of all medical expenses they incur until they reach the set deductible for their policy. Some policies have cumulative family deductibles.

- Expenses usually include the monthly insurance premiums, the deductible and a co-insurance amount (a percentage of the cost, shared with the insurer).

- The co-insurance amount varies dependent on whether the patient has chosen to see a provider that is in-network or out-of-network. For example, if a patient visits an in-network doctor's and the total bill is $100, they may be required to pay a 20% coinsurance (they will pay the doctor $20 and the insurer will pay the doctor $80).  For out-of-network doctors there may be a 40%/60% split instead.  This encourages policy enrollees to seek in-network providers only.

- Some healthcare providers will expect the deductible and/or coinsurance to be paid at the time of service.  In this case the patient will be given an itemised invoice and receipt.  Other healthcare providers may send a bill for the deductible and/or coinsurance at a later date.  In both cases, the insurance company will send a statement (for information only) to the patient reflecting these payments.

- Some in-network providers will charge a co-payment instead of the coinsurance for certain limited services on a PPO plan.  For example, a 'Wellness Check' (annual health screening for preventative purposes) or an Emergency Room visit may be included on the policy as a service that carries a set co-payment amount.  In the case of both of these, if any 'treatment' or 'service' is required, the patient will usually also be responsible for the deductible/coinsurance.  For example, a friend of mine attended a Well Woman checkup (covered by a co-pay on her policy).  At the end of the appointment, the Doctor asked if she had any questions and she asked about a health issue of concern.  As this was an issue not strictly covered by the Well Woman Check-up, she was billed for a doctor's visit in addition to the co-pay!

- PPOs have a set out-of-pocket maximum.  This is a cap or limit on the amount that an individual will have to spend in any plan year.  Due to the variability in out‐of‐pockets costs on a PPO plan, out‐of‐pocket maximums help PPO members gauge the total they will pay in any one plan year. Once the out-of-pocket maximum has been reached, the insurance company will pay 100% of the cost of medical services.  The maximums are usually higher for out‐of‐network services and the maximums do not cross accumulate.


3.  Point of Service (POS)
A point of service plan, or POS plan, combines characteristics of traditional indemnity, HMO and PPO plans.

- Individuals with a POS plan only choose which system to use at the time of service. Like an HMO plan, a POS gives lower medical costs in exchange for more limited choice. However, the flexibility of a PPO is there if the patient requires it.

- A patient with a POS plan is required to choose an in-network primary care physician to monitor their health care and to be their "point of service". However, unlike with a traditional HMO, the primary POS physician may then make referrals outside the network if the patient requests it. However, the patient will only receive partial reimbursement by the health insurance company if they choose to take this route.

- For medical visits within the health care network, a co-payment and/or coinsurance is collected and the paperwork is completed for the patient. If the patient chooses to obtain a referral outside the network, it is the patient's responsibility to fill out the forms, send bills in for payment, and keep an accurate account of health care receipts.

----------------------------

I hope the overview of policy types has been helpful.  Please see the other posts in this series for more information.

PART 1: An Expats Guide to Understanding the US Medical System ... an Overview
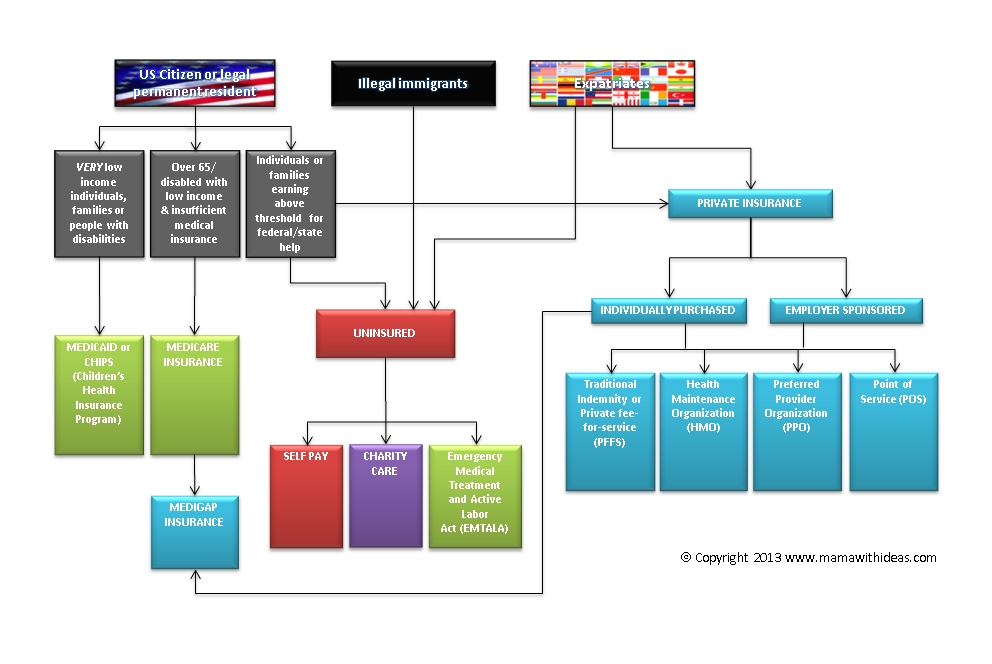
This article gives an overview of the US Medical System as summarised by this flow diagram.


And coming soon...
PART 3: An Expats Guide to Understanding the US Medical System ... Where to go for healthcare
PART 4: An Expats Guide to Understanding the US Medical System ... Paying the bill


----------------------------

GLOSSARY OF TERMS

CO-PAYMENT (a.k.a. CO-PAY) - A fixed-dollar amount that is paid at the time a health service or treatment is received.

CO-INSURANCE - A percentage of the cost of care that the patient is responsible for paying. For example, if a doctor's visit is $100 and you have a 20% coinsurance, you will pay the doctor $20 and your health plan will pay the doctor $80.

DEDUCTIBLE - A set amount that the patient is responsible for paying before the insurance benefits begin. An excess. For example, if you have a $1000 deductible, you are responsible for paying out $1000 from your pocket before the insurance will start paying for your health services.

IN-NETWORK - Refers to providers or health care facilities with whom the insurance company has negotiated a discount. Insured individuals usually pay less when using an in-network provider, because those networks provide services at lower cost to the insurance companies with which they have contracts. Services by out-of-network providers may not be covered, or covered only in part by an individual’s insurance company.

OUT-OF-POCKET MAXIMUM - A predetermined limited amount of money that an individual must pay out of their own pocket, before an insurance company will pay 100%of the individual's health care expenses.

PRIMARY CARE PHYSICIAN (PCP) - A health care professional (usually a physician) who is responsible for monitoring an individual’s overall health care needs. Like a GP.
[ Read More ]

Posted by Maxine Cleminson - - 0 comments

Gee whizz... time flies when you're having fun! It's been an absolute age since I blogged on here and I apologise for my tardiness but, frankly, I've been having too much fun elsewhere!!! However, this evening I have been 'abandoned' by Him Indoors who has headed to the pub so I thought I would sit down and spend some time writing.

But what to write about? To be honest, craft projects have been a little thin on the ground of late (see above excuse) and my spare time has been taken up with planning our super duper summer vacation to California. However, a joking comment made by a friend a little while ago has been hanging around in my head. For those of you who haven't followed my blog, I self published a book in January 2013 entitled "The British Expat's Guide to Grocery Shopping in America"... a labour of love based on my 3 years experience of navigating the US grocery stores through the eyes of a Limey expat! Within a week or two of publication I was told by a friend over a glass of wine... "So, you've written about the food shopping, what you should do now is tackle the medical insurance system!" This comment was scoffed at by all in attendance... as no one, I repeat no one, truly understands it all. Even the Americans.

But... it did start the beginnings of an idea deep in my head. There is absolutely no way I am going to try to write a book explaining the US medical insurance system. It is too big, too complicated and I just wouldn't know where to start. The problem is that there are so many different policies out there that are all slightly different that you'd never be able to comprehensively detail all of it. However, that doesn't mean that there isn't the need for a higher level overview... especially one aimed at expats who struggle to understand the terminology let alone the policy intricacies.

So, this is where I come in. Firstly, a caveat. I am a Brit and so have been brought up with the NHS (national health service)... an institution that entitles every British man, woman and child with free healthcare from cradle to grave (if you want it). Obviously, there is the option for private health insurance in the UK in addition to the care available from the NHS but having utilised both, I can honestly say that the care is pretty much the same and usually provided by the same doctors that also work in the NHS (you just get a coffee brought to you by the concierge in the waiting area of a private practise and more convenient appointment times). Obviously, my thoughts on state funded healthcare provision are going to be a little influenced by this background, but I am going to try to refrain from weighing in on the healthcare reform debate ('Obamacare') as I truly don't understand it well enough.


Therefore, this is an overview of the current system and an explanation of terminology (in laymans terms) and usual procedures. Read on to find out more...

OVERVIEW

Healthcare is one of the leading industries in the United States and US hospitals are at the forefront of many medical advancements and cutting edge therapies. I've lost count of the times I've heard local people say here in Houston, "Well, if you're going to get sick, this is the place to do it!" In fact, here in Houston the medical industry rivals the oil & gas industry for dominance. So why is the US falling behind other developed countries in important health indicators such as infant mortality, life expectancy, cardio-vascular diseases, teen pregnancies, disabilities and STDs? The answer is because there is unequal access to healthcare provision. A 2004 Institute of Medicine (IOM) report said: "The United States is among the few industrialized nations in the world that does not guarantee access to health care for its population." Consequently, it is estimated there are 48,000 unnecessary and preventable deaths in the US every year.

This is because nearly all healthcare provision in the US is through private sector businesses. Their objective is to make money. Healthcare is therefore expensive to purchase, and being a big country with a big population, the US government cannot afford to pay for equal access to healthcare for everyone (at least, not with taxation at current levels). Consequently, most individuals in the US opt to have medical insurance to safeguard them against potentially high healthcare costs in the event that they become sick.

BUT... and here's the kicker... private medical insurance is ALSO expensive. The vast majority of people under the age of 65 have to purchase private medical insurance, often sponsored and subsidised by employers as a taxable benefit. The government does what it can and provides state funded or subsidised insurance (Medicaid, CHIPS, Medicare, Medigap etc...) for those in poverty, but for those just above the means tested threshold, often being uninsured and keeping your fingers crossed you don't get sick is the only option. Approximately 16% of the US population is in this position.

One question I often pondered when I first arrived in the US is that surely (having taken the Hippocratic Oath) doctors would/could not turn away a sick or injured person from hospital? And for the uninsured this IS luckily the case thanks to the Emergency Medical Treatment and Active Labor Act enacted by congress in 1986. This act states that hospitals are obliged to treat emergency conditions of ALL patients that present themselves regardless of their citizenship, legal status or ability to pay, until they are stabilised and able to “self-care” following discharge. Note, this does not mean cured. In reality, this means that many uninsured families resort to using the hospital emergency rooms for treating things like ear infections that under 'normal' circumstances would be treated by a GP or primary care physician (who would charge lots of money requiring insurance). Something like 55% of all ER visits now go unpaid, which unfortunately means healthcare providers shift the costs onto those who can pay. A vicious circle indeed.

For those who do purchase medical insurance the levels of coverage vary widely and there are numerous types of policies, the most common types being traditional indemmity (a.k.a. Private Fee For Service, PFFS), Health Maintenance Organization (HMO), Preferred Provider Organization (PPO) and Point of Service (POS) plans. These will be explained in greater detail in Part 2.

The system is huge and very complicated, but for the benefit of a newbie expat trying to understand everything I have summarised the overview above into a flow diagram.


As you would imagine with a topic as BIG as this, there will be a series of posts. Coming soon...

PART 2: An Expats Guide to Understanding the US Medical System ... Types of Insurance
PART 3: An Expats Guide to Understanding the US Medical System ... Where to go for healthcare
PART 4: An Expats Guide to Understanding the US Medical System ... Paying the bill


[ Read More ]

Posted by Maxine Cleminson - - 0 comments

Wow... Easter is fast approaching!  I had planned to get this post done and published well in advance of Easter weekend, but with a trip back to the UK, and the resultant jet-lagged week from hell... all the best plans blah, blah, blah!  Easter is one of my favourite holidays!  I love it because Spring is in the air (unless you're in the UK and experiencing a blizzard), the days are getting longer and it's just a lovely excuse to spend time having fun outdoors with the family.  In the US, the traditions at Easter are slightly different than in the UK.  The Easter Bunny ranks up there with good ol' Santa Claus and so an Easter Egg hunt is the cornerstone of most celebrations.  The shops are FULL of hundreds of small, cheap plastic eggs that get filled with equally cheap candy and treats which can be hidden around gardens and parks across the country for the various egg hunts that take place!

In the UK, the traditions are slightly different.  It's more about the culinary associations... a baked leg of Lamb on Easter Sunday, hot cross buns and simnel cake.  When I was a child, we would be given one large-ish chocolate egg that was filled with our favourite candies, rather than the hundreds of small filled plastic ones common here today.  In fact, my mother even had a chocolate mold in which she would make them.  And she very kindly bequeathed these chocolate molds to me (complete with the original postage box circa 1983 ... haha!).  So this year, I decided to make Easter eggs for my boys... something heartfelt and made with love, rather than tacky plastic commercialism!


And what did I come up with?  An Angry Birds Egg!!  Commercial, much?!!  :-)


You will need...
  • An Easter egg shaped candy mold like one of these below.


  • A variety of coloured candy melts ... if you are making the red Angry Bird like the one pictured, you will need red, black, white & yellow.  These are available in craft shops such as Michaels or online.


    • A paintbrush reserved solely for food use.
    • Some egg cups or small microwave proof dishes.
    • A cellophane bag and gift ribbon.


    Firstly, it's important to consider the process of layering the candy so you can determine the order in which to 'paint' your melted candy.  You are working from the outside in, so any surface details need to be painted on first before you cover them, so for example, pupils BEFORE whites of the eyes!

    For the red Angry bird you will need to paint the black outlines of the Angry Bird's face first.  Melt just a few black candy wafers carefully in the microwave or over a double boiler (for more information on how to melt candy successfully read this post).  Then using a paintbrush, paint the outlines of the bird's face in mirror image onto the inside of the candy mold and allow to harden.


    Next, melt just 1 or 2 yellow candy wafers in an egg cup or small dish, and paint the melted candy over the beak outline (you can cover the center line).


    Do the same for the eyes using white candy.


    You can also then mix a little of the yellow into some of the white candy to make a pale cream yellow colour.  Use this to paint the bird's underbelly.


    Melt a bowl full of red candy melts (enough to fill both egg molds 1/4 inch thick).  Mix a tiny bit of the red with some of the black you used for the face outlines and create the dark red spots on either side of the red bird's face.


    When all these features have cooled and set.  Pour in the red candy gently, working quickly so that it doesn't melt your face underneath.  Spread up the sides of the mold and put in the fridge for 5 minutes to harden quickly.  Another thin layer may be necessary to give the egg an adequate thickness.


    Turn the eggs out onto a sheet of greaseproof paper.  Use a spoon to tap the outside of the mold and gently pull the mold away.  You may need to use a sharp knife to loosen the edges.


    Once the eggs are out, try not to handle them, as your warm fingers and hands are enough to melt the candy and leave fingerprints.  Gently turn the eggs over and use a little more melted red candy around the rims of the eggs to attach the two sides together.  You could fill the inside with candy before sticking them together, for example M&Ms.


    Wrap in a clear cello bag and tie with a gift ribbon to prepare as a gift.


    Happy Easter!

    I'm now off to make some more... ideas include Spiderman, a monkey (use whole brown candy wafers stuck on the sides for ears), Darth Vader etc...    Who would you make?!
    [ Read More ]

    Posted by Maxine Cleminson - - 0 comments


    I am so excited I could almost burst! :-) A real, touchable, sit-on-the-shelf, pick-up-and-read-able paperback edition of my book is now available! Yay!!! I am very grateful for all the support and encouragement I have received so far... thanks so much, folks! And here it is...


    Also available in Kindle format by clicking here.


    [ Read More ]

    Posted by Maxine Cleminson - - 0 comments


    I am done.  Not in the sense of being 'done in', although that too at times!  I mean, I'm done writing my little project and it's finally been published!!!  Yay!!  It's taken nearly a year of actual writing but the idea has been simmering away for almost 3 years so it's a very satisfying moment to see it come to fruition.  Admittedly, the writing has taken waaaay longer than it really should have... I mean, it's no War & Peace.  But I've written it whilst juggling the task of bringing (who am I kidding, dragging) up my 3 little monkeys, trying to keep up this blog and all the other things demanding my time and attention.  I've actually loved the writing process and could see myself doing more of it in the future... long into the future!

    In addition to this announcement, I ought to apologise for my absence from this blog since November.  I have had a bit of a set back with my Graves' disease.  I was in remission, but unfortunately it has proven short lived (boooo!).  My endocrinologist has had me back on the drugs (and not in a good way) for the last couple of months and my thyroid function has dropped dramatically.  Cue very tired and unmotivated me.  It was a good nagging from long-suffering Him Indoors that finally gave me the kick up the butt I needed this week to get my book finished and published, and I realised I have been moping about doing nowt for too long!  So I am making a concerted effort to get back into doing everything!  Mind over matter and all that!

    So here it is...


    Available in Kindle format on Amazon.com. Click here for the link!

    For other e-reader formats, it is available on Smashwords. Click here for the link!


    Thanks very much!!!

    Mama Max
    xxx


    [ Read More ]

    Posted by Mama Max - - 0 comments


    I am very excited to announce my latest project ... an e-book that I have been writing over the year and that is due to be published on Amazon in the next month or so (see the email signup sheet at the bottom of this page if you want to be notified when it's published)! The title is a bit of a giveaway, but I'll give you the lowdown anyway!

    Him Indoors, the kids and I left our quiet, leafy village in Berkshire in April 2010 and made the very daunting step of moving to a new country. As first-timers to the expat lifestyle, we really didn't know what to expect and it was a nerve-wracking experience in many aspects. Understandably, my husband's immediate concerns were starting his new job; after all, his acceptance of the new role was the reason why we had uprooted our family and moved 6,000 miles to Texas, and I think he felt a huge responsibility to us to make it a success. Consequently, that left the management of the 'domestic' stuff up to me and it was a little overwhelming.

    I have always been a born organiser and I love project managing things; our D.I.Y. wedding was a great example of this and I endured a lot of good-natured jesting from Him Indoors about the elaborate spreadsheet tracker I set up to keep tabs on all the details (this was back-in-the-day before Pinterest)!!! I attempted to manage the relocation process in the same way, and was somewhat successful.


    The difficulty with moving abroad is that even the smallest differences can throw you out of your comfort zone, and even though the USA shares a lot of cultural & lifestyle similarities with Britain, especially compared to locations in Africa or Asia, the small differences can add up to a confusing and stressful situation.

    When we moved, the twins were 17 months old, and the Big One had just turned 5. My biggest concern was maintaining a sense of normality wherever possible... kids are very adaptable but I just wanted to make it as easy as possible for their sake. One of the issues I faced (and still do) is that my boys are quite fussy eaters. They know what they like, and are happiest when we stick to the familiar. When we had been on holiday before, the boys had virtually stopped eating for the whole week. So, I was understandably worried about what food choices there would be and how they would adapt.

    I turned to the Internet for some research, assuming that the supermarkets in Texas would have online shopping sites in the same way that Tesco's and Waitrose did in the UK. No such luck. I tried a few expat forums, but invariably, the discussions centered around how to find British food favourites in America!

    So, we arrived in the States with no idea about what we would be able to buy in the grocery stores. It may seem a little dramatic to have worried about such a thing in the light of everything else going on, but as a mother, the ability to feed your children well becomes a bit of an obsession!

    My first grocery shopping trip occurred the evening that we landed in the States. I had been awake for over 24 hours, was hot & sweaty (having left a chilly England wrapped up warm and arriving in the blazing heat of Texas) and really just needed to crash. However, I braved the supermarket to get some basics so that I could at least give the boys breakfast when they awoke in the early hours with jetlag! The supermarket felt very alien and what would have taken me 15 minutes in the UK (all I wanted was the basics) took almost an hour! Even the checkout process was different and confusing. It's almost laughable now how stressful I found the situation, because if I had been travelling on my own without the kids or if it had just been a holiday I wouldn't have cared at all. But it was strange knowing that this was going to be my new reality... and at that particular time, it didn't feel very real!


    A few days later, I braved the supermarket again to do a 'big shop'. Thankfully, I had my Mum with me (who had traveled with us to help with the kids), but it still took 4-hours of dithering and stressing!

    Almost three years on, grocery shopping is a routine chore, much in the same way it was in the UK. However, there are still times when I can't find something I need in the supermarket and have to try to explain to a confused American what I mean by 'marzipan'. Furthermore, in those years I feel I have gained enough insight to be able to share with others some of the key things you might want to know as a British expat shopping in America.

    The e-book is designed to be a detailed source of information to ease the worries of an expat prior to their move to the USA. However, it is also designed to be used as a reference book for those occasions when you need to find something (like marzipan!) and haven't got a clue where to start!

    The e-book includes the following:

    • a section on where & how to shop, coupons, trolleys, bags, weights & measures and more...
    • a load of information about food additives used in America and how to avoid them
    • detailed chapters on the main food groups; vegetables & fruit, dairy, meat, fish, canned goods, grains, condiments, drinks, candy etc... with translations, recommendations and alternatives to your favourite UK brands
    • a chapter specifically addressing baby & toddler food with comparisons to UK brands and recommendations for similar US alternatives
    • information on shopping for people with allergies and food intolerances
    • some details about household & cleaning supplies, including laundry products
    • a chapter about food shopping for Christmas and other holidays
    • a list of sources of British foodstuffs you can't live without and some suggested substitutions when you can't get the things you need
    • a clickable index so that you can use the book as a ready reference guide

    Finally, I have also included some printable shopping lists to ease the transition from the UK to the US.  One is to take with you on your first shop to get the basics... a list of suggested basics so you can survive your first few days!  The other is a more detailed list that will help you recreate your UK store cupboard once you are settled here in the states.


    If you are keen to be notified when the book is released, simply enter your email address in the form below. I will send you a confirmation email and then when the book is released I will send you a notification.


    * Required Free Contact Form
    [ Read More ]

    Posted by Mama Max - - 0 comments

    It's been a monumental(-ish) week in our house as the twins move from their cot beds into full-sized single beds! Eeeek... can't believe they will be four in a couple of months! Their move into big boy beds has gone relatively smoothly, but the Chubby Cheeks One was only convinced to give up his old 'wittle bed' on the proviso that he could still have cowboy bedding. The junior sized bedding he had on his bed until this week was handmade out of some fabulous fabric I found online at www.jandofabrics.com ... great for novelty fabrics! However, as were moving up into larger sizes I wanted to buy some ready made bedding. As Brits, we are used to using continental duvets and covers rather than flat sheets and a comforter or bedspread and so it is hard to find a large selection of designs of these in the USA. Luckily, I was able to source some fabulous Cath Kidston cowboy printed bedding from UK department store House of Fraser who delivered to the US within the week for only £6 (about $10)! Delighted!

    The only problem is that living in a rented property, we are aswim in a sea of beige.  I blogged about this before when describing my cheap and easy wall art solution for our master bedroom, and the other bedrooms in our home are similarly colored... beige walls, beige carpet, beige curtains and cream paintwork.  Perfectly inoffensive and neutral for tenants to live in, but not colorful enough for my liking!  So, I wanted to add some non-permanent accents to the room to coordinate with the new bedding.  This is the results of an hour or twos effort and a few bucks...


    My solutions:
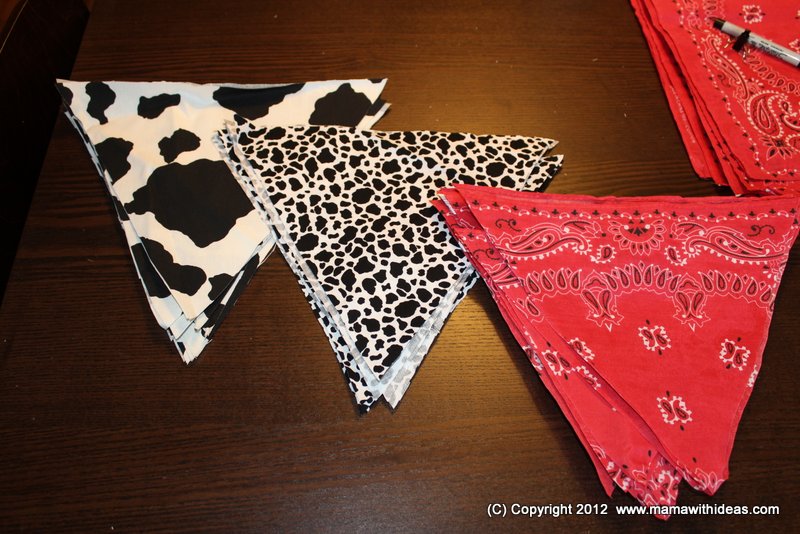
    • String of flag bunting - using cowboy inspired red bandanas and cowprint cotton fabric.
    • Simple square cushions made from contrasting bandanas.  Plus a felt fabric Cactus cushion I made (this was a pre-blogging effort from last year, but I am going to create a pattern to share soon).
    • Padded fabric notice board to display treasured art work!
    • A couple of cheap rugs - one larger one for the floor and a smaller star-shaped one for the wall!


    Make your own Cowboy Bunting - Tutorial
    You will need:
    • A selection of fabrics ... offcuts and quilting fat corners work well and are quite cheap to buy.  For the cowboy themed decor I bought a set of red bandanas designed to be used in a Wild West themed party.
    • Several yards of coordinating ribbon or bias binding.
    • Sharp scissors, sewing thread and dressmaking pins (a sewing machine makes this job super quick but you can obviously sew by hand as well).
    • An iron & ironing board.
    • A ruler & pen.


    First of all, decide which size and shape flags you want.  I chose to make equilateral triangles with sides approximately 9 inches long, so I marked out the measurements on one of the bandanas before cutting one triangle.  I then used that triangle as a template to cut more.  You will need 2 triangles per flag, so make sure you cut an even number.


    Pin the right sides of two of your triangles together and pin carefully.  You can tack them together if you prefer, or if you are confident enough just sew them together on two edges leaving a 1/2" seam allowance.  If your fabric has a pattern (like my bandanas) you may wish to line up the pattern for all the flags or go for a more random look.  Repeat for all of the flags.


    Carefully trim the excess fabric around the tip so that you will have a neat corner once turned inside out.  Turn each flag right sides out and press with an iron so the seams are flat.  Trim any excess fabric along the top open edge of the flag.


    Next, organise your bunting into the order you want them to be lined up.  I had 3 different patterns of fabric and wanted a repeating pattern of 1-2-3-1-2-3 etc..  If using ribbon, gently press a crease in the middle and then pin the open end of the flags into the crease (this is easier with bias binding).  Leave approximately 12" of ribbon at each end so your bunting can be tied up.  Once pinned (tack if you prefer) you can sew the ribbon in place so that the open end of the flag is sandwiched in the middle.  Continue sewing the ribbon closed at each end of the bunting so that your ties are neat too.


    Your bunting is now ready to display!


    Make a Simple Cowboy Cushion - Tutorial
    You will need:

    • Two bandanas of same size in contrasting colours.
    • Polyester fiberfill stuffing or alternative.
    • Sharp scissors, sewing thread, pins and a sewing machine.

    Simply place the two bandanas right sides together, pin (tack if you prefer) and sew together leaving a 5-6" gap in the seam to allow it to be stuffed. Turn the pillow case inside out and press the seams flat.  Fill with your chosen pillow stuffing and then pin the gap closed and sew shut.  Easy peasy!


    Make a Padded Notice Board - Tutorial
    You will need:

    • A sheet of thin MDF (or plywood, or cork).
    • Quilting batting cut to slightly larger than your wood.  A few layers if it is low loft.
    • A piece of fabric slightly larger than your wood.
    • A coordinating ribbon - Cotton grosgrain works well.
    • A staple gun.
    • A ring pull from a soda can.
    • Glue or strong adhesive (I used a hot glue gun).

    Lay your fabric right side down onto the table.  Put the batting onto the fabric and then lay the sheet of wood on top.  Gently stretch the fabric over the edge of the sheet of wood and staple into place.  Do the edges first and then fold the corners neatly into place last of all.  Then cut lengths of your ribbon to create a criss-cross pattern on the front of the notice board.  Secure in place with staples at the back.

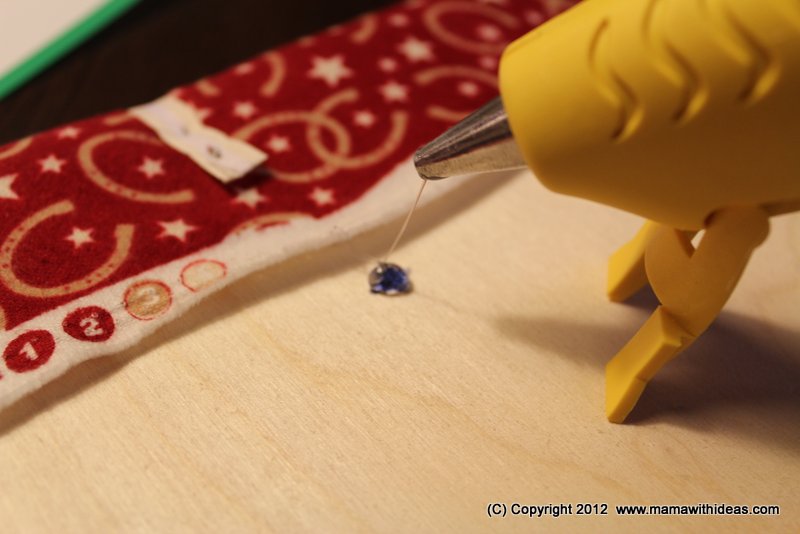
    To create a hanger for the notice board, use this brilliant (Pinterest derived... see my earlier blog) tip ... use a drinks can ring pull.  Glue it into place in the center of the back near the top edge and then you can hang the board from a normal picture hook.


    Cowboy themed rugs

    Small rugs make excellent, inexpensive wall decor, especially if you can get them shaped to suit your theme like these:


    A large area rug can really help brighten a room without making permanent changes (great for use in a rental home!).


    I hope you like these ideas and would be delighted to hear of any more suggestions!

    [ Read More ]

    Related Posts Plugin for WordPress, Blogger...