It's been a monumental(-ish) week in our house as the twins move from their cot beds into full-sized single beds! Eeeek... can't believe they will be four in a couple of months! Their move into big boy beds has gone relatively smoothly, but the Chubby Cheeks One was only convinced to give up his old 'wittle bed' on the proviso that he could still have cowboy bedding. The junior sized bedding he had on his bed until this week was handmade out of some fabulous fabric I found online at
www.jandofabrics.com ... great for novelty fabrics! However, as were moving up into larger sizes I wanted to buy some ready made bedding. As Brits, we are used to using continental duvets and covers rather than flat sheets and a comforter or bedspread and so it is hard to find a large selection of designs of these in the USA. Luckily, I was able to source some fabulous
Cath Kidston cowboy printed bedding from UK department store House of Fraser who delivered to the US within the week for only £6 (about $10)! Delighted!
The only problem is that living in a rented property, we are aswim in a sea of beige. I blogged about this before when describing my
cheap and easy wall art solution for our master bedroom, and the other bedrooms in our home are similarly colored... beige walls, beige carpet, beige curtains and cream paintwork. Perfectly inoffensive and neutral for tenants to live in, but not colorful enough for my liking! So, I wanted to add some non-permanent accents to the room to coordinate with the new bedding. This is the results of an hour or twos effort and a few bucks...

My solutions:
- String of flag bunting - using cowboy inspired red bandanas and cowprint cotton fabric.
- Simple square cushions made from contrasting bandanas. Plus a felt fabric Cactus cushion I made (this was a pre-blogging effort from last year, but I am going to create a pattern to share soon).
- Padded fabric notice board to display treasured art work!
- A couple of cheap rugs - one larger one for the floor and a smaller star-shaped one for the wall!
Make your own Cowboy Bunting - Tutorial
You will need:
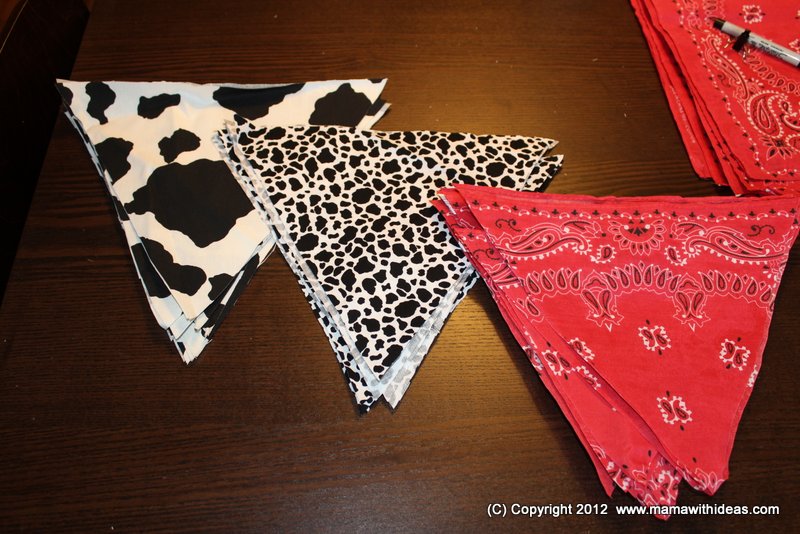
- A selection of fabrics ... offcuts and quilting fat corners work well and are quite cheap to buy. For the cowboy themed decor I bought a set of red bandanas designed to be used in a Wild West themed party.
- Several yards of coordinating ribbon or bias binding.
- Sharp scissors, sewing thread and dressmaking pins (a sewing machine makes this job super quick but you can obviously sew by hand as well).
- An iron & ironing board.
- A ruler & pen.

First of all, decide which size and shape flags you want. I chose to make equilateral triangles with sides approximately 9 inches long, so I marked out the measurements on one of the bandanas before cutting one triangle. I then used that triangle as a template to cut more. You will need 2 triangles per flag, so make sure you cut an even number.


Pin the right sides of two of your triangles together and pin carefully. You can tack them together if you prefer, or if you are confident enough just sew them together on two edges leaving a 1/2" seam allowance. If your fabric has a pattern (like my bandanas) you may wish to line up the pattern for all the flags or go for a more random look. Repeat for all of the flags.


Carefully trim the excess fabric around the tip so that you will have a neat corner once turned inside out. Turn each flag right sides out and press with an iron so the seams are flat. Trim any excess fabric along the top open edge of the flag.


Next, organise your bunting into the order you want them to be lined up. I had 3 different patterns of fabric and wanted a repeating pattern of 1-2-3-1-2-3 etc.. If using ribbon, gently press a crease in the middle and then pin the open end of the flags into the crease (this is easier with bias binding). Leave approximately 12" of ribbon at each end so your bunting can be tied up. Once pinned (tack if you prefer) you can sew the ribbon in place so that the open end of the flag is sandwiched in the middle. Continue sewing the ribbon closed at each end of the bunting so that your ties are neat too.


Your bunting is now ready to display!

 Make a Simple Cowboy Cushion - Tutorial
You will need:
- Two bandanas of same size in contrasting colours.
- Polyester fiberfill stuffing or alternative.
- Sharp scissors, sewing thread, pins and a sewing machine.
Simply place the two bandanas right sides together, pin (tack if you prefer) and sew together leaving a 5-6" gap in the seam to allow it to be stuffed. Turn the pillow case inside out and press the seams flat. Fill with your chosen pillow stuffing and then pin the gap closed and sew shut. Easy peasy!


 Make a Padded Notice Board - Tutorial
You will need:
- A sheet of thin MDF (or plywood, or cork).
- Quilting batting cut to slightly larger than your wood. A few layers if it is low loft.
- A piece of fabric slightly larger than your wood.
- A coordinating ribbon - Cotton grosgrain works well.
- A staple gun.
- A ring pull from a soda can.
- Glue or strong adhesive (I used a hot glue gun).
Lay your fabric right side down onto the table. Put the batting onto the fabric and then lay the sheet of wood on top. Gently stretch the fabric over the edge of the sheet of wood and staple into place. Do the edges first and then fold the corners neatly into place last of all. Then cut lengths of your ribbon to create a criss-cross pattern on the front of the notice board. Secure in place with staples at the back.
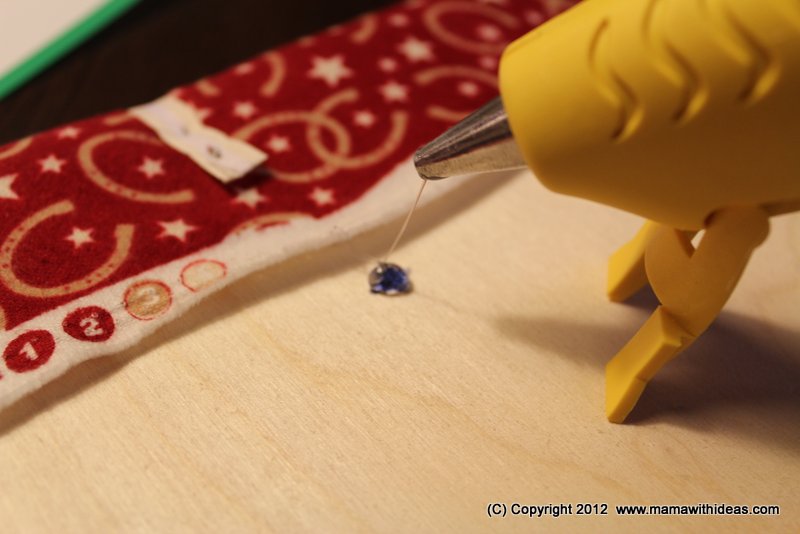
To create a hanger for the notice board, use this brilliant (Pinterest derived...
see my earlier blog) tip ... use a drinks can ring pull. Glue it into place in the center of the back near the top edge and then you can hang the board from a normal picture hook.


Cowboy themed rugs
Small rugs make excellent, inexpensive wall decor, especially if you can get them shaped to suit your theme like these:
A large area rug can really help brighten a room without making permanent changes (great for use in a rental home!).
I hope you like these ideas and would be delighted to hear of any more suggestions!