• RSS
  • Facebook
  • Pinterest
  • Twitter
  • Google+
Showing posts with label recycling. Show all posts
Posted by Mama Max - - 0 comments

A while ago, I blogged an idea for storing necklaces using shower curtain hooks.  It was only as I was writing that blog entry and adding the photos that I got a little embarrassed about the state of the shelf above my neatly organised necklaces.  There was makeup items strewn all over the place.  Let's face it, ladies... makeup is a pain to store at the best of times.  I've given up using a makeup bag (except when travelling) as they always end up a bit yucky inside... it only takes a top to come off a kohl pencil or an eyeshadow case to open and the whole thing is a powdery, icky mess.  But at the same time, it's a bit of an eyesore to have it all strewn over the bathroom (or closet) counter.  So I was totally inspired by an idea documented on a blog called Laura Thoughts.  She used a picture frame with a sheet of metal to create a magnetic display for her makeup.  Fabulous and very creative.  So I decided to use her idea, but to use recycled bits to create my own.


You will need...


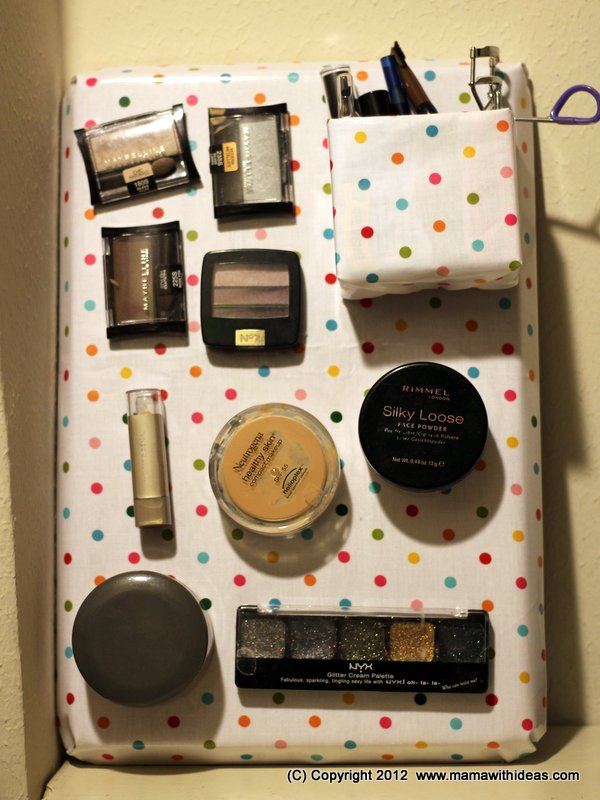
Cut a piece of fabric a few inches wider than your cookie tray all the way around.  Place the cookie tray on the wrong side of the fabric and fold the fabric up and over the sides of the tray.  Glue into place, making neat folds at the corners.  Turn the tray over and you have a pretty magnetic board!


Cut strips of magnetic tape, and glue to the back of your makeup items.  The heavier the item, the more magnetic tape you will need.  The items can then be put on the tray.


Cut a small box to the right size to store your smaller items such as mascaras, kohl pencils etc...  Wrap it in some more of the fabric and glue in place, neatening the edges.  Attach more magnetic strips to the back of the box and attach to the board.


You can either prop the board up on your bathroom counter or closet shelf, or hang on the wall next to your mirror.  All the items you need are easily visible and obtainable, and kept out of the way!  Easy peasy, and only 20 minutes to make!


[ Read More ]

Posted by Maxine Cleminson - - 0 comments

I was totally inspired by a pin on Pinterest showing a handy way to de-mystify the tangle of cables at the back of your furniture! We've all been in that situation where you've accidentally unplugged the alarm clock instead of the lamp, only to have to reset the time (grrrr!). Well, the easy fix for this issue is to label your cables, and the humble bread tag is the perfect recycled solution! Simply write the name of the appliance on the bread tag and slip it over the cable near the plug end. Perfect.


With this brilliantly simple solution in mind, I have been collecting bread (and potato bag) tags for a while, even designating a container in my newly organised kitchen cupboards for this purpose. But ever since this small, but handy, piece of plastic has registered on my radar I have been coming up with other uses for them. Check them out:


A cheap and simple wine glass tag... keep track of your drink when entertaining!


A key tag so you can identify & label all those random little keys in the drawer!


A perfect sized pan-scraper that won't damage your non-stick surfaces and will get in all the nooks and crannies unlike a normal scourer!

It would be brilliant to hear of some other ideas on ways to recycle these ingenious little thingamajigs, so leave a comment below if you have one to share!
[ Read More ]

Posted by Maxine Cleminson - - 1 comments

I am a sucker when it comes to jewelry! I am not talking diamonds (although, I love the ones Him Indoors gave me), rather, I am talking the cheap-and-cheerful type! I am definitely a bit partial to a beaded or long pendant style necklace, but there is no getting away from the fact that they are a bugger to store! I have a lovely leather jewelry box with plenty of drawers and compartments, but, necklaces will invariably become entangled and indistinguishable from one another! So I was looking for a solution to storing them in a fashion that enabled me to see them all whilst getting dressed (for easy outfit assemblage), that was totally easy to use without any fiddling about (I am notoriously lazy with things like this) and that was as cheap-and-cheerful as the necklaces themselves!

The solution came in the form of some old shower curtain hooks I found at the back of a cupboard in our bathroom (thanks to our landlord for not tossing them out)! They are admittedly a little dated, but this lends itself to a slightly bohmeian 'shabby chic' ambience!


You will need...

  • A set of decorative style shower curtain hooks - second hand/thrift stores, garage sales or ebay might be worth a look for some old and inexpensive hooks.  Or if you prefer a more specific look or something quite contempory, check out these...


  •  A closet rail
  • A selection of fabulous necklaces!!!


You simply slide the hooks onto a hanging rail in your closet.  The hooks are designed to fit over a shower curtain pole and to slide easily, so they are supposed to go onto a pole with a smaller diameter.  However, they also just about slide onto a standard closet rail albeit with a slightly snugger fit... this worked well as there was less movement once the hooks were in place. The hooks are then perfect for looping necklaces over.


This could not be simpler, but it has really helped me keep the clutter in my closet under control... with the obvious exception of the shelf above as evidenced in the pics below!  :-)


[ Read More ]

Posted by Mama Max - - 0 comments

Earlier last week, I posted a few ideas to get your Diamond Jubilee street party planning on the way, including some themed cupcake wrapper printables.  I decided to extend that idea further, and create an easy (and adaptable) cupcake stand to display these little beauties on!  Cupcake stands are very popular at the moment, but are usually quite expensive for what they are!  This one is made from carboard, paper and florists' foam (but you could easily use all recycled materials to keep costs even lower!).  I kept mine relatively simple so as not to detract from the cupcakes themselves and also so that the cupcake stand can be easily adapted for another occasion!


You will need...
  • Cardboard
  • Scissors
  • A ruler or tape measure
  • 3 Cylindrical foam blocks - however, you could use recycled food cans or paper tubes.  I chose 2 taller and narrower ones and a wider, but shorter one for the base.
  • Glue - I find a hot glue gun is the easiest for crafts like this but you can use any multipurpose adhesive
  • Colored paper to match your theme - scrapbooking paper or cardstock is great for this, but you could also use gift wrapping paper.
  • Ribbon - approximately 3 yards depending on the size of your circles!  The width of the ribbon must be thicker than your cardboard, but can be narrow or wide depending on the look you're aiming for.  A wide ribbon can look very effective and would give the illusion of more solid plates.


First of all, you need to cut 3 circles of card in ascending size.  My largest circle was 12" in diameter and the second and third progressively smaller.  I used a variety of plates to draw around to get the right shape.


Glue the circle onto a sheet of colored or patterned paper - I used wrinkle-free gluestick to achieve a smooth surface.  The paper I chose was a fabulous 'velvet' feel paper from a selection of scrapbooking papers in my local craft store ... I felt it was suitably regal for the occasion! :-)


Once the paper is stuck to the circle of card, trim the excess paper with scissors.


Next, cover your cylinders of foam (or recycled cans/tubes) with colored paper... this can be the same paper as the circles, or a contrasting/complementing color or pattern.  I chose a slightly glittery royal blue!


Once all the cylinders & circles are covered with paper you can mark the centers of the bases with a pen, using a ruler.


Use these pen marks to help you line up the cylinder and glue into place.  I placed my wide/short cylinder onto the bottom (biggest) circle to create the base of the cupcake stand.  As the foam shed bits of dust, I cut another circle of card to cover the bottom and glued into place.


I then glued another cylinder to the center of the top of the base circle.  One important thing to remember is to line up the line where you have wrapped the paper around the cylinder.  This makes it look so much neater.  Repeat with the final cylinder and circle.


Finally, you need to disguise the edge of the cardboard circles.  To do this, glue a length of ribbon around the edge (hanging down if you have chosen a wide ribbon).


As a final (optional) touch, I decided to add some street party bunting and a Union Jack flag to my cupcake stand.  I have included a free printable at the bottom of this post if you would like to use this!

You will need...

  • the printed bunting and flag sheet (see below)
  • scissors
  • a wooden/bamboo skewer
  • glue
  • cotton thread


Firstly, cut out the larger Union Jack flag, fold in half around a wooden skewer and glue.  Push into the top of your cupcake stand (this is why florist's foam is useful!).


To make the bunting, cut out the diamond shaped double union jack pennants.


Fold in half and line up, evenly spaced.  Lay a length of cotton thread in the crease, and glue the diamond in half to make a triangle.


Glue the bunting around the cupcake stand to decorate!


Click on the preview images below to open the printable .pdf files... they are set up to be printed on standard letter sized paper (8.5"x11").  These printables are provided free on the understanding that they are for personal use only and not to be reproduced, altered or used for commercial purposes (please contact me for more information if necessary)!  Thanks!
[ Read More ]

Related Posts Plugin for WordPress, Blogger...