• RSS
  • Facebook
  • Pinterest
  • Twitter
  • Google+
Posted by Maxine Cleminson - - 2 comments

Him Indoors has been making an effort to get on top of the tangle of cables/chargers/things-with-wires that we have stashed in various office drawers/cupboards/boxes.  I guess it's a sign of the times we live in, but I honestly can't believe how many of the darn things we have floating around!  I don't think it helps that every manufacturer seems to have a slightly different take on the same thing!

Yet again, I'm posting with an idea that's not mine.  Hmmmm.  As before, this one is also too good to not share!  Him Indoors was inspired by a pin he saw online (hahaha... he's now Pinterest obsessed too!) and has been on a mission ever since.  The original idea comes from a chap called Beserk who posted a tutorial on Instructables.com, however, my clever hubbie has been improvising with pipe insulation too!

It really is the simplest idea.  Why are they always the best?


You will need...
  • A tangle of cables in desperate need of sorting out!
  • An empty cardboard box, approximately 6 inches deep (a shoe box would do, but a large spotlight lightbulb box did the trick for us).
  • A variety of cardboard tubes - toilet paper rolls work well, as do kitchen paper ones cut in half.  Alternatively, you could use a length of pipe insulation tube, cut into 4-5 inch lengths (the nice thing about pipe insulation is that it is split down the length allowing easy insertion of the cables, but still grips them tightly).
Like the design of a bees' honeycomb, you essentially create an array of hollow cells separated by thin walls.  Each cell (tube) contains a neatly folded cable and can be removed independently from the box, without disturbing the others.  Another benefit is that you can easily see the item you are looking for with a quick glance!


Easy peasy!


[ Read More ]

Posted by Maxine Cleminson - - 0 comments

Jo, an old school friend of mine has started up her own cake making business, The Little Gingerbread House, and has been having huge success with her amazing cakes, cupcakes, cookies and other delectable delights! Go to her Facebook Page and 'Like' it to see some of the amazing edible creations she comes up with! You can also place online orders through her Facebook page ... great for expats like myself who want to send an affordable yet special gift to someone back in the UK!

She posted some of her fabulous items this week as she prepared a stall of goodies for a Christmas market, and I found myself totally inspired by her ideas! So, although this isn't my idea (which is technically, the point of my blog), it was inspired by another very creative mama! Thanks, Jo, for allowing me to share!

At this time of year, there's a lot of commercialism and pressure to give gifts to a lot of people... especially here in the USA, where the etiquette for tipping and gift giving at Christmas extends to just about everyone (that makes us Brits sound like right stingy so-and-sos... we're not, honestly)! So, this is an easy solution for a gift that shows you care for and appreciate someone, without it costing an absolute fortune, and without buying into the overly packaged, gimmicky nonsense marketed in the stores at this time of year!

The idea for this gift, is that you give someone a jar full of all the dry ingredients (weighed, measured & sifted), plus the instructions so they can bake their own fresh cookies! You can also accessories with wooden spoons, or cookie cutters! The recipient may need to add an egg, some butter, oil or syrup depending on the cookie recipe that you make, but the rest is fully prepared! Essentially, like a Betty Crocker packet, but prettier, with wholesome ingredients and prepared with love (tee hee)! I think it's a lovely personal gift, that shows thought and effort. Plus, it can be tailor-made to suit your recipient (using gluten free flour for those with allergies for example!).

At this point, I should say... if you are The Big One's teacher... look away now!


Gingerbread Man Cookie Mix Jar

You will need...

  • A 1 quart (1 litre) Mason/preserving jar... either the kind with the screw top or the rubber seal/clip. These are readily available in stores and are very good value. I bought mine for $1.50 in a large craft store locally.
  • 1 yard of pretty, festive ribbon - look in the discount bins in the craft store... I got a great selection for just $1 each!
  • 1 themed cookie cutter - bargain at 99c!
  • 2 cups (250g) all purpose (plain) flour
  • 1 teaspoon baking powder
  • 1 teaspoon baking (bicarbonate) soda
  • 1 cup (200g) dark brown sugar
  • 1 1/2 cups (190g) all purpose (plain) flour - and yes, I do mean to repeat this ingredient!
  • 2 teaspoons ground ginger
  • 1 teaspoon ground cloves
  • 1 teaspoon ground cinnamon
  • 1 teaspoon allspice

Firstly, sift together 2 cups of all purpose flour with the baking powder and baking soda.  Then spoon into the jar.  Shake to settle it as much as possible, and then press it down... the end of a rolling pin is useful for this.  You will need to do this to make sure you get all of the ingredients in the jar! The ninja headband sported by The Big One is, of course, optional!


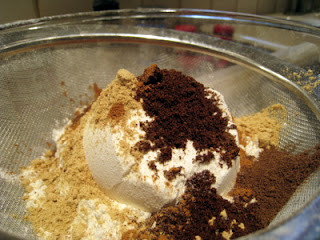
Next measure 1 cup of dark brown sugar, spoon into the jar and pack down again.  Lastly, sift together the remaining 1 and a half cups of flour with the spices.  Spoon into the jar, pressing down as necessary.


Seal the jar and then decorate with ribbon and tie on any accessories, such as cookie cutters or wooden spoons, that you want to include.


You will then need to provide the recipient with instructions on how to use their cookie mix.  The Big One created a handwritten masterpiece, but you could copy and paste the text below and create a sticky printable label or a printout tag with festive clip art!


The full instructions are as follows:

1. Empty contents of jar into a large mixing bowl. Stir to blend together.
2. Mix in 1/2 cup softened butter or margarine, 3/4 cup molasses, and 1 slightly beaten egg. Dough will be very stiff, so you may need to use your hands. Cover, and refrigerate for 1 hour.
3. Preheat oven to 350'F (175'C).
4. Roll dough to 1/4 inch thick on a lightly floured surface. Cut into shapes with a cookie cutter. Place cookies on a lightly greased cookie sheet about 2 inches apart.
5. Bake for 10 to 12 minutes in preheated oven. Decorate as desired.

This idea works brilliantly for all types of cookie recipes, and even things like brownies! Adapt the recipe/instructions/accessories however you like!

To make things as convenient as possible for your recipient, you may wish to supply some of the other items.  For example, we decanted 3/4 cup of molasses into a clean jar (an empty cake sprinkles pot was the perfect size) so that The Big One's teacher only needs to provide and egg and some butter to make the cookies!  We also included a small pot of festive decorating sprinkles (in the Dollar section at Target!).  Finally, put all your items together with some tissue paper in a gift bag (we even made a gingerbread man shaped gift tag for our bag!), and you have a thoughtful, affordable gift that someone will truly appreciate!


And of course, if you're weighing out the ingredients anyway... it'd be rude not to whizz up a batch of your own cookies!  What a fun activity to entertain the kids and some friends than to spend some time decorating your own gingerbread man.  Just mix up some simple powdered icing sugar with a tiny bit of warm water, and provide a variety of sprinkles and candies for the kids' to get creative with!  Paper cupcake cases are great for this!


[ Read More ]

Posted by Maxine Cleminson - - 0 comments


Silent Sunday

[ Read More ]

Posted by Maxine Cleminson - - 2 comments

I've been stuck indoors for the last few days with one poorly twin and another who's been bouncing off the walls and in need of something to do!  So I decided to brave an activity with him that I had been planning to do solo, and was delighted to find that it was suprisingly child-friendly and a fun way to spend some time with my little one while his brother had a much needed nap on the sofa!

The project I had been planning was to make a orange & clove pomander.  I have always thought that these look lovely and Christmassy... plus, I'm all into heavenly scented interiors and think the combination of citrus, clove, and other spices is perfect for the winter!  These classic 'air fresheners' have been popular since medieval times and form the basis of many family holiday traditions.  When properly cured (dried out) they can last indefinitely, requiring just an occasional refresh in boiling water for a minute before re-drying!  The only issue is that they require patience and can take weeks if not months to cure properly.

However, I am not your patient sort (ahem...) and like instant results!!!  So, I cheated slightly and jump-started the drying process in the oven!  I also don't necessarily expect them to last a lifetime... if they don't cure properly and need discarding after Christmas, I'm not going to lose any sleep.  Afterall, the Shouty One and I spent an enjoyable hour together making them and we benefitted from the gorgeous scent for a few weeks... that makes it worth it in my book!


You will need...

  • A firm, blemish-free orange (choose one that smells divine even through the skin!!)
  • Whole cloves - you can buy these in the spice aisle in the supermarket, but they can be expensive, so look out for them in the bulk food aisle or in health/whole food stores.
  • Approximately a yard of ribbon (1/2" or 1cm wide is perfect).
  • A tablespoon each of ground cinnamon, ground nutmeg and/or ground allspice (optional)
  • A skewer or toothpick
  • Sticky tape or masking tape


First of all, you should use the tape to mark out where your ribbon will go so that you can pierce the cloves around it.  You will probably want to tie the ribbon in a cross with two lengths circling the ball perpendicular to each other (like a gift wrapped present).


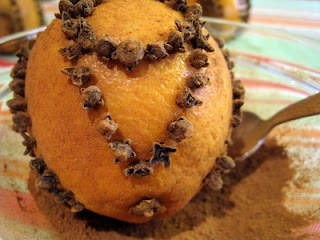
Then, you will find it easier if you use a skewer or toothpick to pierce the orange skin prior to inserting the cloves.  You should pierce all the way through the skin to the flesh underneath.  If you try to insert the cloves without doing this you often end up crushing them!  You can pre-design where you plan to insert your cloves by marking the skin with a pencil... intricate designs are fun, but so too is the random mass covering favored by the Shouty One!  My 3 year old managed to wield the skewer carefully (under strict supervision obviously) and he really enjoyed this bit!  Once you have created your holes, insert the cloves into the skin pointy end first, until securely embedded.


The Shouty One (with Monkey looking on) proved suprisingly adept at this and it was good practise of his fine motor skills!


Different designs work equally well.  Remove your tape when finished.


At this point, if you were being traditional, you would prepare the pomander for curing.  This involves tossing the orange in a pungent mix of spices, plus some Orris Root powder (apparently, this ingredient is made from the ground root of a type of Iris and is a natural preservative).  You could use a few drops of Sandalwood oil instead of the Orris Root.  Then you would put the orange pomander, plus the spices/preservative agent in a paper bag, and store in a cool, dry place for an extended period (between 3 weeks and up to 6 months) until completely dried out.  You can tell when a pomander is completely cured as it will have shrunk in size and will feel light and hollow.

As mentioned above, I'm not that patient!  I tossed my orange pomanders in a mix of ground spices and then placed them into a cooling oven (after cooking the boys tea) for a few hours with the convection fan on.  The smell that wafted around my house was simply heavenly!


After that, tie the ribbon around the pomander creating a hanging loop and a bow at the top.  You can then hang your pomander somewhere warm and dry so that it can continue to dry out while you enjoy the fragrance.  Keep an eye on your pomander and if it looks like it's not drying, but going bad, you will have to discard it!


So pretty and festive!  And they smell gorgeous too!


[ Read More ]

Posted by Maxine Cleminson - - 3 comments


I've always admired those fancy Christmas Stocking holder thingys that go on the mantlepiece, weigh down the stocking and look gorgeous all at the same time (see the fancy example below)! And those personalised ones are even better, enabling Santa to identify the correct Stocking first time! However, with three children to purchase these for, I've never been able to justify the expense, especially at nearly $15-20 each!. So, this year I decided to make something similar myself on a limited budget!

Engraved Nickel-Plate Stocking Holders - 2945


I couldn't think of anything suitably dense to use as a weight heavy enough to hold a fully loaded stocking, and didn't want to risk breakages, so decided not to make a stocking holder... these are purely decorative markers to label each persons' stocking (stockings which I expect Santa will take down from the mantlepiece, fill with treats and leave in a prominent position at floor level... or so I've been reliably informed)!

You will need...

  • Unfinished wooden pre-cut letter(s) - these are available in craft stores for about $2-3 depending on the size and font, but I've also seen them in DIY stores.  You can also purchase them cheaply online on places like ebay for a few bucks.  You will need the sort with flat bottoms that can stand freely on their own.
  • Wooden pre-cut embellishments - these are optional, but add a little Christmas jazziness!  Again, you'll find these easily in your local craft store!  I chose small, thin snowflakes (they were only 49 c each!).
  • Small pot(s) of acrylic paint - choose festive colors, or coordinate with your home decor.  Contrasting or complementary colors are useful for the embellishments.
  • Paint brushes
  • Newspaper or similar to protect your worksurfaces, plus an apron etc...
  • Glitter in matching colors to your paints.
  • Multi-purpose craft or wood glue.

Firstly paint your letters in the colors you have chosen.  If you have a mirror over your mantlepiece it is a good idea to make sure that you take the time to paint the back of your letter first, allow to dry before turning over... that way you won't see the ugly unfinished back of the letter in reflection!  Paint the surface of the letter evenly (doing more than one coat if necessary), and while the paint is still wet sprinkle your matching glitter over the surface thickly so that it covers the paint.  Leave to dry.


Repeat with any embellishments you are planning to use.  I chose contrasting colors to match my brightly colored stockings.  Leave to dry.


Once the paint is completely dry, carefully shake off any excess glitter that hasn't stuck to the paint.  Decide where you would like to place the embellishment, before sticking in place with glue.  Leave to dry again.


You can then simply stand your monogrammed stocking marker on the mantlepiece above the stocking, which you will have to attach with another method (I can recommend 3M Command removable hooks, adhesive hooks some of which can hold up to 5 lbs but that remove cleanly afterwards ... available in white, but also bronze).


[ Read More ]

Related Posts Plugin for WordPress, Blogger...