• RSS
  • Facebook
  • Pinterest
  • Twitter
  • Google+
Showing posts with label sewing. Show all posts
Posted by Mama Max - - 2 comments

Another Halloween is fast approaching, and the Big One has come up trumps again with another costume request that initially confused me.  Last year he wanted to be the Lego Ninjago master Sensei Wu and after a bit of investigating, I was able to make a costume for him, much to his delight.  This year, he asked to be Ash Ketchum.  I initially wondered why the dickens he wanted to go as the former husband of Demi Moore, until I realised that I was getting confused with Ashton Kutcher... an easy mistake to make if you are not up to date with the fads and obsessions of your average 7 year old!  Ash Ketchum is of course the main protagonist of the popular Pokemon series of manga/anime cartoons and all the related card games/merchandise that has become the Big One's raison d'etre.  He's also the 'trainer' of the iconic Pikachu  pokemon character.

So this year's costume has been coming together over the last few weeks.  You can actually buy Ash Ketchum costumes (unlike the Sensei Wu dude from last year), but as with a lot of these things, they are quite expensive and often "one trick ponies". I like the idea of adapting 'normal' clothes into costumes so that the kids can get some wear out of them.  The Big One's school has also changed it's policy for Halloween costumes, requiring that the children change into their costumes at school rather than go in already dressed up.  With fiddly fastenings I figured this was a recipe for disaster.  Plus, as a 'normal' 10-year old boy, Ash Ketchum's clothes are relatively straightforward as a costume goes.  Blue jeans, black-t-shirt, white/blue shirt, sneakers, baseball cap & fingerless gloves!  All quite easy.  So really, it's just a case of getting the details right to pull the outfit together.  I've detailed all of the parts of the costume that I purchased below... but I thought I'd also include a quick tutorial on how to make your own Pokeball... one of the key accessories to making this costume work.  You can buy Pokeballs, but they were about $10-15 for a 2.5" diameter foam ball ... and I just couldn't bring myself to spend that sort of money on it when they are so easy to make!


You will need...
  • A red ball, plastic or foam, approximately 2-3" in diameter.  I used one that came from a ball pit set.
  • White acrylic paint, or nail polish, or gloss paint.
  • Paintbrush
  • Black craft foam or paper
  • A white plastic bread tag (or more craft foam)
  • Scissors
  • Glue

Firstly, paint half the sphere of your ball white (you could use a white ball and red paint if you preferred).  Allow to dry, and apply another coat if necessary.


Cut a strip of black craft foam about 1/2" thick and glue around the middle of the ball, over the top of the edge of the paint.  Leave a gap of approximately 1" where the ends meet.


Cut a circle of black craft foam 1" in diameter and glue into the gap.


Using an old bread tag (or some white craft foam), cut a circle using a penny as a template.  Glue onto the black circle.  It's as easy as that!


Once you have your pokeball made, it's just a case of putting the other details together to get the Ash Ketchum look!


I managed to buy the cap and gloves as a set on Ebay for about $20.  These were perfect and added a level of authenticity to the costume.


A black short haired wig was also required to turn my blonde Big One into a convincing Ash Ketchum.  The spiky boy's punk wig below was perfect to achieve the manga look!  Click on the image for more details.


Then, instead of the blue/white bowling style shirt, I simply paired a plain white short-sleeved shirt with a blue fleece gilet.  I lightly attached some yellow ribbon (with easily removeable running stitches) to trim the bottom and pockets.  The gilet was from Land's End and once Halloween is over, I'll simply remove the yellow ribbon and he'll be able to wear it on the occasional chilly days we have here in Texas!


Finally, Ash Ketchum wouldn't be complete without his special Pokemon, the iconic Pikachu.  We bought this plush character on Amazon to finish the outfit off.  Click on the picture for more details.


The outfit is ready and waiting to go now and I'll update this post with a picture of the ensemble after Halloween! Happy track-or-treating!!!


Update: The full ensemble for Halloween!!

[ Read More ]

Posted by Maxine Cleminson - - 0 comments

We have a very practical, but not very pretty plastic picnic bench in our garden. Living in hurricane prone Texas, I wanted a cheap and cheerful garden set that was durable and low maintenance, but that could also be stored indoors at very short notice in case of an impending storm (hey, we don't have a pool to chuck them in like other locals do!)... better that, than having table sized shrapnel blown into the house! Our picnic bench is sturdy, functional but not in the slightest bit stylish. And I have tried covering it in tablecloths but then you always have the issue of where to stick the umbrella!!

But I found the perfect, low cost and (dare I say it?) stylish solution... plus it literally only takes 5 minutes and no sewing! I'd seen tablecloths for sale designed specifically for picnic tables, with elaborate zipper or velcro openings (from the center to the edge of the cloth)... but in considering the dilemma, I figured all you would need is a way to neatly create an edge to a hole big enough for the umbrella pole to slide through. Bias binding would work, but would be fiddly and time consuming. And then... the perfect solution popped into my head! Curtain grommets or eyelets!!!!


You will need:

  • A tablecloth that fits your table... this could be made from any material, including wipe clean oilcloths!
  • Scissors
  • A pen or dressmakers chalk
  • A curtain grommet with an internal diameter wide enough to fit your pole... mine measured 1-9/16" across and said it would fit curtain rails up to 1-3/8" and it worked brilliantly!


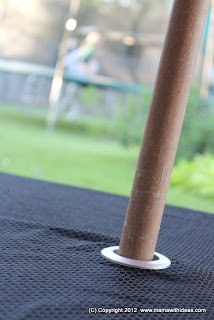
Firstly, work out where the center of your tablecloth is and mark it with the pen or chalk. Cut a circle out that is slightly smaller than the internal diameter of the grommet (your grommet may even come with a template!).


Line up the male and female sides of the grommet on either side of the fabric.


Clip the two sides of the grommet together to conceal the cut edges of the hole in the fabric. Iron if needed et voila!


So this is the before...


And this is the after!


Much nicer!!!!
[ Read More ]

Posted by Mama Max - - 0 comments

It's been a monumental(-ish) week in our house as the twins move from their cot beds into full-sized single beds! Eeeek... can't believe they will be four in a couple of months! Their move into big boy beds has gone relatively smoothly, but the Chubby Cheeks One was only convinced to give up his old 'wittle bed' on the proviso that he could still have cowboy bedding. The junior sized bedding he had on his bed until this week was handmade out of some fabulous fabric I found online at www.jandofabrics.com ... great for novelty fabrics! However, as were moving up into larger sizes I wanted to buy some ready made bedding. As Brits, we are used to using continental duvets and covers rather than flat sheets and a comforter or bedspread and so it is hard to find a large selection of designs of these in the USA. Luckily, I was able to source some fabulous Cath Kidston cowboy printed bedding from UK department store House of Fraser who delivered to the US within the week for only £6 (about $10)! Delighted!

The only problem is that living in a rented property, we are aswim in a sea of beige.  I blogged about this before when describing my cheap and easy wall art solution for our master bedroom, and the other bedrooms in our home are similarly colored... beige walls, beige carpet, beige curtains and cream paintwork.  Perfectly inoffensive and neutral for tenants to live in, but not colorful enough for my liking!  So, I wanted to add some non-permanent accents to the room to coordinate with the new bedding.  This is the results of an hour or twos effort and a few bucks...


My solutions:
  • String of flag bunting - using cowboy inspired red bandanas and cowprint cotton fabric.
  • Simple square cushions made from contrasting bandanas.  Plus a felt fabric Cactus cushion I made (this was a pre-blogging effort from last year, but I am going to create a pattern to share soon).
  • Padded fabric notice board to display treasured art work!
  • A couple of cheap rugs - one larger one for the floor and a smaller star-shaped one for the wall!


Make your own Cowboy Bunting - Tutorial
You will need:
  • A selection of fabrics ... offcuts and quilting fat corners work well and are quite cheap to buy.  For the cowboy themed decor I bought a set of red bandanas designed to be used in a Wild West themed party.
  • Several yards of coordinating ribbon or bias binding.
  • Sharp scissors, sewing thread and dressmaking pins (a sewing machine makes this job super quick but you can obviously sew by hand as well).
  • An iron & ironing board.
  • A ruler & pen.


First of all, decide which size and shape flags you want.  I chose to make equilateral triangles with sides approximately 9 inches long, so I marked out the measurements on one of the bandanas before cutting one triangle.  I then used that triangle as a template to cut more.  You will need 2 triangles per flag, so make sure you cut an even number.


Pin the right sides of two of your triangles together and pin carefully.  You can tack them together if you prefer, or if you are confident enough just sew them together on two edges leaving a 1/2" seam allowance.  If your fabric has a pattern (like my bandanas) you may wish to line up the pattern for all the flags or go for a more random look.  Repeat for all of the flags.


Carefully trim the excess fabric around the tip so that you will have a neat corner once turned inside out.  Turn each flag right sides out and press with an iron so the seams are flat.  Trim any excess fabric along the top open edge of the flag.


Next, organise your bunting into the order you want them to be lined up.  I had 3 different patterns of fabric and wanted a repeating pattern of 1-2-3-1-2-3 etc..  If using ribbon, gently press a crease in the middle and then pin the open end of the flags into the crease (this is easier with bias binding).  Leave approximately 12" of ribbon at each end so your bunting can be tied up.  Once pinned (tack if you prefer) you can sew the ribbon in place so that the open end of the flag is sandwiched in the middle.  Continue sewing the ribbon closed at each end of the bunting so that your ties are neat too.


Your bunting is now ready to display!


Make a Simple Cowboy Cushion - Tutorial
You will need:

  • Two bandanas of same size in contrasting colours.
  • Polyester fiberfill stuffing or alternative.
  • Sharp scissors, sewing thread, pins and a sewing machine.

Simply place the two bandanas right sides together, pin (tack if you prefer) and sew together leaving a 5-6" gap in the seam to allow it to be stuffed. Turn the pillow case inside out and press the seams flat.  Fill with your chosen pillow stuffing and then pin the gap closed and sew shut.  Easy peasy!


Make a Padded Notice Board - Tutorial
You will need:

  • A sheet of thin MDF (or plywood, or cork).
  • Quilting batting cut to slightly larger than your wood.  A few layers if it is low loft.
  • A piece of fabric slightly larger than your wood.
  • A coordinating ribbon - Cotton grosgrain works well.
  • A staple gun.
  • A ring pull from a soda can.
  • Glue or strong adhesive (I used a hot glue gun).

Lay your fabric right side down onto the table.  Put the batting onto the fabric and then lay the sheet of wood on top.  Gently stretch the fabric over the edge of the sheet of wood and staple into place.  Do the edges first and then fold the corners neatly into place last of all.  Then cut lengths of your ribbon to create a criss-cross pattern on the front of the notice board.  Secure in place with staples at the back.

To create a hanger for the notice board, use this brilliant (Pinterest derived... see my earlier blog) tip ... use a drinks can ring pull.  Glue it into place in the center of the back near the top edge and then you can hang the board from a normal picture hook.


Cowboy themed rugs

Small rugs make excellent, inexpensive wall decor, especially if you can get them shaped to suit your theme like these:


A large area rug can really help brighten a room without making permanent changes (great for use in a rental home!).


I hope you like these ideas and would be delighted to hear of any more suggestions!

[ Read More ]

Related Posts Plugin for WordPress, Blogger...