• RSS
  • Facebook
  • Pinterest
  • Twitter
  • Google+
Showing posts with label husband. Show all posts
Posted by Maxine Cleminson - - 4 comments

Today is the birthday of long suffering Him Indoors (... Happy birthday, love!) and so I made a cake yesterday for him to take into the office to share with his colleagues!  When I asked the Big One what cake I should make, he replied with the oh-so-helpful "whatever Dad likes best"!  So, I started to consider ideas... and while hubby-dearest may have appreciated it, there was no way I was going to make a Preston North End FC cake!!!  So, another of his passions came to mind... technology!  I am married to a geek... a fellow Geologist and technophile, he's never happier than when faffing with some new gadget or other!  His iPad is a current favourite and with it's sleek form and iconic status was an obvious choice!  So an iPad cake was the choice for Dad... an iDad Cake, if you like!!!


I thought I would blog about the technique I used for this cake as it's become my favourite way of decorating a cake... I used it recently for the Big One's Peregrine Falcon cake!  I am completely useless at piping frosting and get in a right mess, however, I can wield a paintbrush with reasonable accuracy.  Playing to my strengths, I therefore paint my cakes out of choice!

You will need...

  • A cake... I made a large rectangular-shaped Chocolate Guiness cake (it's a recipe from Nigella Lawson's cookbook, "Feast", and it is simply divine)
  • Enough buttercream (or jam) to cover a thin layer over the cake
  • White ready made fondant icing
    sufficient to cover your cake
  • Powdered icing sugar (to dust your board and rolling pin)
  • Rolling pin
  • Sharp knife
  • Powdered edible color pigments, e.g. Wilton's Color Dust
    or food colors specifically designed for painting/stamping, e.g. Wilton's Dab-N-Color
    (normal food coloring runs and isn't quite so successful)
  • Clear vanilla extract or clear alchohol
  • A paintbrush to be used exclusively for food
  • A plate to use as a palette
First of all, you need to cover your cake with fondant icing.  Make sure the cake surface is as level and smooth as possible to give a good finish.  Roll the fondant icing until a 1/4 inch thick and wide enough to cover the cake entirely with an excess (use a fine dusting of icing sugar on your work surface and rolling pin).  Spread a thin layer of buttercream or jam over the surface of the cake (so the icing sticks) and then gently lift the sheet of icing (using the rolling pin to help) and drape over the cake.


Smooth the surface of the fondant icing very gently taking care not to stretch or tear it.  Then using a sharp knife, trim the excess icing so that the cake is fully covered.  Take care not to trim too much... you can always trim more, but if you cut too much off first time, it's nearly impossible to fill the gap discreetly!  I used a ribbon around the base of the cake to hide a few rough edges.  Stick the ends of the ribbon to the cake with a dab of paste made from icing sugar and water.


You can then paint directly onto the surface of the 'blank canvas'.  Alternatively, I cut shapes out of extra pieces of fondant icing and painted these... this gave a slightly 3D effect, but also made for neater edges (especially when using a dark color).  I also used some ready-colored fondant icing in black to cut out the outer edge of my iPad shape.


To paint the cake, you simply need to mix small amounts of the powdered pigment with some clear vanilla extract or alcohol to make a liquid (or use the liquid edible color instead).  I used a small egg cup with the clear alcohol in it and used it to dip my brush in (as if painting with watercolors!).  Mix your colors on a plate to get the shades you need.  From red, yellow, blue, white and black you can create the full spectrum of colors you need, for example:
  • Red + yellow = orange
  • Blue + yellow = green
  • Red + blue = purple
  • Red + white = pink
  • Red + black = burgundy
  • Blue + white = pale blue
  • Blue + black = navy blue
  • Yellow + white = cream
  • Yellow + black = mustard
  • Red + yellow + blue + black = brown
  • Red + yellow + blue + white = beige
Then simply, paint the images you like onto the surface of the fondant icing.  Allow to dry for a few hours and then done!  For my iPad I cut extra small pieces of fondant icing and decorated with the paints and an edible ink marker pen ( I use the AmeriColor Gourmet Food Writer  ones... I then stuck these on with a little dab of water on the back.


[ Read More ]

Posted by Maxine Cleminson - - 2 comments

Him Indoors has been making an effort to get on top of the tangle of cables/chargers/things-with-wires that we have stashed in various office drawers/cupboards/boxes.  I guess it's a sign of the times we live in, but I honestly can't believe how many of the darn things we have floating around!  I don't think it helps that every manufacturer seems to have a slightly different take on the same thing!

Yet again, I'm posting with an idea that's not mine.  Hmmmm.  As before, this one is also too good to not share!  Him Indoors was inspired by a pin he saw online (hahaha... he's now Pinterest obsessed too!) and has been on a mission ever since.  The original idea comes from a chap called Beserk who posted a tutorial on Instructables.com, however, my clever hubbie has been improvising with pipe insulation too!

It really is the simplest idea.  Why are they always the best?


You will need...
  • A tangle of cables in desperate need of sorting out!
  • An empty cardboard box, approximately 6 inches deep (a shoe box would do, but a large spotlight lightbulb box did the trick for us).
  • A variety of cardboard tubes - toilet paper rolls work well, as do kitchen paper ones cut in half.  Alternatively, you could use a length of pipe insulation tube, cut into 4-5 inch lengths (the nice thing about pipe insulation is that it is split down the length allowing easy insertion of the cables, but still grips them tightly).
Like the design of a bees' honeycomb, you essentially create an array of hollow cells separated by thin walls.  Each cell (tube) contains a neatly folded cable and can be removed independently from the box, without disturbing the others.  Another benefit is that you can easily see the item you are looking for with a quick glance!


Easy peasy!


[ Read More ]

Posted by Maxine Cleminson - - 0 comments

Okay. So I know that the whole point of Silent Sunday, is to post a single photo from the week without commenting. However, I'm breaking the rules slightly. First of all, I am posting more than one pic. Also, I didn't take all of them (but I am in the ones I didn't take). However, in keeping with the Silent Sunday rules, I will not comment on any of the pics and let you enjoy them without my annotations!

One final note, I promise to get back to regular blogging next week when I'm feeling a bit better!

Much love!


[ Read More ]

Posted by Maxine Cleminson - - 5 comments

or could also be titled... "Pimp my Pumpkin!".

My husband, Him Indoors, has been a bit obsessed by the amazing pumpkin carvings you see online!  So I thought I'd have a go at immortalising him in squash ready for the upcoming Halloween festivities.  This is for him... love you, hun!


Don't be put off if you think you're not very artistic as it's suprisingly straightforward to do once you have edited your photograph properly!

You will need:
  • A decent digital photograph, preferably one where the subject's features are somewhat shadowed so there's a good contrast between light and dark.
  • A software program that allows you to edit photos.  I used Paint.net, a free downloadable photo editing software for computers running on Windows.  However, there are loads of similar applications that can be used to equal effect.
  • A printer & paper.
  • Tracing paper or baking parchment.
  • A stapler.
  • A soft pencil.
  • A sharp knife.
  • A spoon.
  • A pumpkin.
  • A candle.
So I started with a great picture of Him Indoors and opened it in Paint.net.  The first thing I did was to remove the sky background as it was too similar in contrast to his head... if your subject's face has a contrasting background you will probably not need to do this step. To do it I used the 'Magic Wand' tool, set at 50% tolerance.  I clicked on the sky behind his head to select it and then deleted those areas.


I then used the 'Paint Bucket' tool, with the color black selected to repaint the sky black.  This provided a greater contrast between Him Indoors' face and the background.  I also used the 'Rectangle Select' tool to select the area of the photo I was focusing on, and then clicked on the 'Crop to selection button.  This removed the parts of the photo I didn't need.


Then I clicked on the top menu 'Adjustments', scrolled down and selected 'Black & White'.


Next, I clicked on the top menu 'Adjustments' again, this time scrolling down to 'Brightness/Contrast'.  By increasing the contrast to maximum and the brightness slightly up, the image became simply black and white with no shades of grey.


Then I clicked on the 'Paintbrush' tool, again with black and setting the paintbrush size to 50.  I was then able to paint over the extra white bits that weren't needed.  The aim is to have a very simple image to carve.


To save ink when printing, I inverted the image (basically switched the white & black areas).  I did this by clicking on the 'Adjustments' menu, and selecting 'Invert Colors'.  Finally, I clicked on the menu 'Effects' at the top, and selected 'Blur', and then 'Median Blur'.  I set the radius setting to 10 with a 50 percentile.  This again simplified the image, removing unnecessary detail.


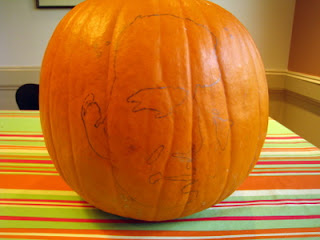
Once the image was printed to the appropriate size (use the printer options to scale the image to fit your paper).  I then had to use the template to get the design on the pumpkin.  To achieve this, I used tracing paper and a soft graphite pencil.  I stapled a piece of tracing paper to the back of the printout.  It's important to do this so that your image isn't flipped when you transfer the tracing onto the pumpkin.  I then held the paper to the window and traced around the outline onto the tracing paper.


Then when I had completely traced the outline of the image, I pinned the tracing paper to the pumpkin with dressmaking pins (making sure the pencil outline was touching the pumpkin skin).  Using my pencil, I gently drew over the back of the image so that the pencil outline was transferred onto the pumpkin.


Then using the sharp knife I gently cut away the surface of the pumpking skin in the areas that were black on my original printout.  Once completed, I hollowed out the inside of the pumpkin with a spoon, being careful not to break through the surface where I had carved the design.  A candle inside the pumpkin revealed the image to it's full potential!


It's a Blog Party


newlyweds-blog.com


Strictly Homemade Tuesday
[ Read More ]

Related Posts Plugin for WordPress, Blogger...