I like to think that I care about the environment... I do my bit by recycling (at least the bits that get collected at the curbside), try to turn off lights, buy recycled paper, use my own shopping bags and don't let the tap run when brushing my teeth. I used washable cotton diapers with my boys for part of the time. I read labels in the supermarket and always try to go with biodegradable, natural and the least-packaged items. I buy organic pesticide-free food when my budget allows and try to eat meat-free meals once a week. All of these small measures salve my conscience a little, but in reality I know that my family and I are some of the people doing most harm to our planet.
We live in a massive (air conditioned) house with far more space than we need. We have a lovely big garden with a lawn that is watered throughout the summer and sprayed to keep the pests away. I drive a mini-van that averages about 20 miles to the gallon (if I'm lucky). And we own countless material objects, all manufactured and shipped from locations that have a huge impact on the Earth. I wish I had the strength of character and resolve needed to live a more modest, less wasteful and environmentally friendly lifestyle, but this has become even harder since moving from the UK to the USA. I swear my carbon footprint has quadrupled since living in Houston... it's not just the hats, hair & trucks that are bigger in Texas!
So it is with mixed feelings that I think about the forthcoming Earth Day on April 22nd. I think it is very important to value and celebrate our wonderful planet. It's even more important to teach our kids about managing resources with care. However, it is hard to do so without feeling a bit of a hypocrite... especially when you drop your child to school in a 3.5 litre V8 engine gas-guzzling car!
Regardless of my inner turmoil, the 7-year old Big One is keen to join in the Earth Day celebrations and demonstrate his 'green' credentials. So I decided to mark the occasion with some sweet treats to try to show how beautiful and complex our planet is, even in minature! A cake ball homage to the Earth!

You will need...

Then take a walnut sized piece of the dough and flatten into a disc shape in the palm of your hand.

Place a whopper in the middle and wrap the 'dough' around it, rolling to form a ball shape. Put the balls on a lined baking tray and refridgerate overnight or for a few hours at least.


Once chilled, dip each ball in melted blue candy wafers (again, if you haven't made cake pops or cake balls before read this tutorial first). Leave on a sheet of baking parchment to harden. Don't worry about excess at the base as you can cut this away with a knife once set.


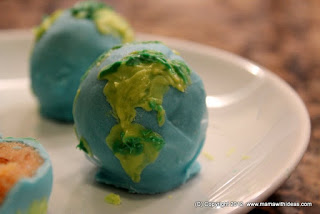
Melt a few green candy wafers in egg cups or small cups. I used two different shades of green. Once melted, use a food-only paintbrush to 'paint' the land onto the globe with the green candy.

As you can see here, I have tried to copy the outlines of the major continents... Europe, Africa & the Middle East here....

... North & South America here...
And inside is revealed the inner & outer core of the Earth... can you tell I studied Geology at University?!


[ Read More ]
We live in a massive (air conditioned) house with far more space than we need. We have a lovely big garden with a lawn that is watered throughout the summer and sprayed to keep the pests away. I drive a mini-van that averages about 20 miles to the gallon (if I'm lucky). And we own countless material objects, all manufactured and shipped from locations that have a huge impact on the Earth. I wish I had the strength of character and resolve needed to live a more modest, less wasteful and environmentally friendly lifestyle, but this has become even harder since moving from the UK to the USA. I swear my carbon footprint has quadrupled since living in Houston... it's not just the hats, hair & trucks that are bigger in Texas!
So it is with mixed feelings that I think about the forthcoming Earth Day on April 22nd. I think it is very important to value and celebrate our wonderful planet. It's even more important to teach our kids about managing resources with care. However, it is hard to do so without feeling a bit of a hypocrite... especially when you drop your child to school in a 3.5 litre V8 engine gas-guzzling car!
Regardless of my inner turmoil, the 7-year old Big One is keen to join in the Earth Day celebrations and demonstrate his 'green' credentials. So I decided to mark the occasion with some sweet treats to try to show how beautiful and complex our planet is, even in minature! A cake ball homage to the Earth!

You will need...
- A cake (either made from a packet mix or your own favourite recipe) crumbled
- Some frosting
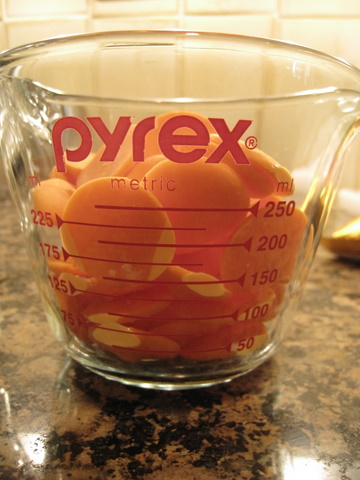
- Whoppers or Maltesers
- Blue Candy melts
- Green Candy melts
- A small paintbrush reserved for use with food only
Make up your cake pop 'dough' by mixing the cake crumbs and frosting... read my tutorial on how to make cake pops here.

Then take a walnut sized piece of the dough and flatten into a disc shape in the palm of your hand.

Place a whopper in the middle and wrap the 'dough' around it, rolling to form a ball shape. Put the balls on a lined baking tray and refridgerate overnight or for a few hours at least.


Once chilled, dip each ball in melted blue candy wafers (again, if you haven't made cake pops or cake balls before read this tutorial first). Leave on a sheet of baking parchment to harden. Don't worry about excess at the base as you can cut this away with a knife once set.


Melt a few green candy wafers in egg cups or small cups. I used two different shades of green. Once melted, use a food-only paintbrush to 'paint' the land onto the globe with the green candy.

As you can see here, I have tried to copy the outlines of the major continents... Europe, Africa & the Middle East here....

... North & South America here...

And inside is revealed the inner & outer core of the Earth... can you tell I studied Geology at University?!