• RSS
  • Facebook
  • Pinterest
  • Twitter
  • Google+
Showing posts with label Lego. Show all posts
Posted by Maxine Cleminson - - 2 comments

One look at Pinterest will give you a gazillion fancy-pants ideas for Lego themed parties... from beautiful party favours to amazing cakes, you will see it all and more! I had a good go at replicating some of these ideas and even came up with a few of my own.


However, one thing I often struggle to find when planning a party is ideas for games & activities outside the normal pinata and pin-the-tail-on-the-BLANK type of things. This is especially tricky the older the kids become as they begin to get quite discerning. While a bunch of 4 year olds will happily entertain themselves with a few hours of side-by-side playing, older kids can easily get quite raucous and need something a bit more challenging!

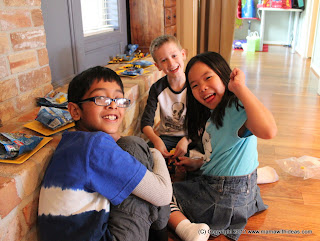
This was the case recently, when the Big One asked for a Lego themed party for his 8th birthday. To be honest, I was hoping that as he approached his tweens I would be able to get away with taking a few of his close friends to the cinema or something similarly 'grown up' but he was insistent he wanted a party. I was pleased to indulge him as this will probably be the last big 'party' for him at home until he wants to illicitly invite a load of unwashed hooligan teenagers around to ours for a bit of underage drinking and general carnage (he will live to regret it if he tries it) or for a milestone like his 18th birthday!

After a bit of thinking I came up with the following party activities and games and they were a resounding success and perfect for the 6-10 age group.

First of all a tip: Assign each child a yellow square paper plate (with a Lego face drawn and their name written on it with permanent marker). This is their plate for the entire party to store things on, so it should be kept somewhere safe.


Activity 1 - Fast Build Contest
Lego frequently produces promotional sets in plastic bags. They are often sold next to the tills in places like Target and are inexpensive (around $4-5 each). Buy enough of the same set for each child attending the party (try ebay if you're struggling to get multiple sets the same)... they can double as a party favour for the child to take home! Cut the tops off every bag and place on their plate without tipping out the contents. Sit the children on the floor with their plate in front of them. Blow a whistle to commence the Fast Build race... the children tip the bag contents onto their plate and assemble the model from the instructions. The winning child is the one who builds the model (accurately) the quickest!

Activity 2 - L-Egg-Oh! Tower Team Contest
For this activity you will need to prepare in advance a bag of Legos for each team (a set of plain building blocks like the one below is useful for this). For the sake of fairness, you may wish to make sure that each team has the same number/variety of blocks. Divide the children into groups (3-4 children per group). You may wish to sort out the groups in advance to a) get the right mix of personalities, b) avoid arguments and c) prevent someone from feeling left out! Give each group a bag of Legos and space them out on the floor. Giving each group a tray will help to contain the spread of Legos as well! The challenge is for the groups to build a tower from blocks that can support an (uncooked) egg. The group with the tallest tower wins, although you may want to hand out additional prizes for the best 'teamwork'!


Activity 3 - Lego Derby Car Team Contest
You can either stick with the same groups or mix the kids up into new teams. You can use the same bags of Lego, but make sure that each bag contains some wheels/axles. Set up a gravity racetrack (similar to that used in Pinewood Derby). I used Hot Wheels track pieces to create two long race tracks side by side and clamped them onto a ledge using the G-clamps. The challenge for each team is to design a Derby Car from Legos. When the cars are completed, take it in turn to race them until a winner is declared! You can also hand out additional prizes for 'coolest car design' or 'teamwork'!


Prize Ideas
Candy is always welcomed by kids, but you can jazz things up a bit by making it into a 'prize'! I used thin (1" x 8") cellophane bags to create 'tubes' of Lego candy, and then printed Lego heads to create toppers which I cut out and glued in place to seal the end and cover the staple at the top.


I also create Lego trophies by gluing a Lego 2x2 flat tile on the front of a plastic trophy with a hot glue gun! You could also use medals!


Happy party planning!
[ Read More ]

Posted by Maxine Cleminson - - 11 comments

The Big One is turning 8 next month and has asked for a Lego Party so I am trying to get ahead of the game and prepare some stuff while we have a weekend at home. So I have been making party favor bags in the shape of Lego bricks... super easy and very effective. I thought I'd share the printable resource I made to make it even easier for you guys!


You will need...

  • Paper party favor bags in bold 'Lego' colours - approximately 8.5" tall x 5.5" wide
  • The Lego studs printable below in matching colors
  • Scissors
  • Glue


Firstly, you will need to print the Lego studs to match your paper bags (see the printable at the bottom of the page). I chose yellow, orange, light green and light blue in a slight departure from the royal blue, red and yellow palette so synonymous with the Lego brand, but I have included printables in a variety of colours and even blank ones to allow you to print onto your own colored paper to match your theme.  My bags were from Target and were cheap and are well made.  You can buy similar online from suppliers such as Party City or Oriental Trading.  You could also use paper lunch sacks or treat boxes in bright colours.  Click on the pictures below for similar bags available from Amazon.


Carefully cut out the circles using a sharp pair of scissors. Glue the circles onto the front of the bag using a glue stick. Line up the 'studs' with approximately 1/2-2/3" between them.


Done.


Click on the thumbnail below to open the printable PDF file.  The document contains all the colors you might need, plus a black & white outline one in case you choose to print on colored paper.


[ Read More ]

Posted by Maxine Cleminson - - 6 comments

Who am I kidding? My parenting style is rather more 'dragging' than 'bringing' up children! I have muddled my way through the last 7 years with more luck than judgement and yet along the way I have gained a few insights into what makes kids tick. I'm sure there are plenty of parenting experts out there who will tell you that you shouldn't reward children for doing the things you've asked of them; that praise and a sense of altruism should be enough for your kiddo, but sometimes that just doesn't cut it in my household. Confession time... I am not above a bit of bribery if it gets the desired outcome. There. I said it.

Not that I make it easy on my kids. They have to work for their rewards and in that sense I see it as a life lesson. And for this purpose I am a big fan of charts!  It must be the scientist in me... because I am a complete sucker for a nice, colourful and clear to follow chart! Sometimes it's for chores, and I've blogged about this before with my pocket money tracker. Other times it's to modify unwanted behaviour or to encourage new things. However, the principal is the same... you set a target, your child earns a reward after completing the required steps to get to that target.

Ideas for targets (we call them 'challenges' in our household):
  • Try new foods
  • Use the potty
  • Brush teeth without complaining
  • Don't backchat
  • Make my bed in the morning
  • Stop biting fingernails/picking nose & etc...
  • Share nicely with my siblings/friends
  • Do-as-I-am-asked-the-first-time-not-the-tenth!

Remember:

  1. Make your targets S-M-A-R-T (specific, measurable, achievable, realistic & timely)! - A good target is easy to measure and is easier to explain to a younger child, however, with my older one I have used a simple challenge of "I will behave better this week" with my judgement being the deciding factor!  The number of steps that need to be completed before the reward will vary with the child's age.  A 2-year old will get easily bored and frustrated if they have to use the potty 20 times before getting their hands on the prize, whereas an older child can understand the process better and can manage a greater challenge.
  2. Two Directions - I've found a useful technique is to allow progress on the chart to be 2-way!  So you can progress towards the prize for good efforts (demonstrating the task/behaviour required), but you can also step back for doing the opposite (refusing to cooperate or an act of bad behaviour)!
  3. Rewards only need to appeal to your child - In terms of reward it doesn't need to break the bank and it may not be something you personally would consider worthwhile... as long as it's something your child craves!  While cold, hard cash seems to be the Big One's raison d’ĂȘtre these days, the twins are still easily pleased with things like an extra story at bedtime or a trip to the park at the end of the week.  Even with the Big One, his understanding of the value of money is still not very developed, so I don't need to offer big bucks!  Other ideas include: offering a set amount of screen time the reward or even the return of items that have been confiscated... desperate times call for desperate measures!!! Lastly, I try not to offer food as a reward as I worry about setting them up for a lifetime of unhealthy food habits.
  4. Chose a chart that 'fits' your child's interests and likes -  This can be a highly motivating factor for a child!  A Thomas train moving along a track towards Knapford Station for a reward might send a train-mad little one off to use the potty quick smart!  Or a Dora the Explorer taking steps up the mountain?  The possibilities are endless!  
  5. Keep up the momentum - place the chart somewhere visible and accessible and make a point of reviewing it at least once a day!


As I've documented on my blog previously, all 3 of my kids are Lego (and Duplo) obsessed, and so the chart below has worked an absolute charm.  The printable charts are available to download for free on the understanding that they are not altered and are used for personal use only (thanks!!).  Simply click on the thumbnails below to open the full-size .pdf files.  Print on standard letter sized paper (8.5'x11"), trim along the dashed line and affix to a wall so the bottom of the chart meets a table top or counter where you can build your Lego tower.


There are two charts to choose from: a Duplo chart for younger children (aged 2 and a half up to about 5) and a Lego chart for older kids (5 and up).  You will need 10 Duplo blocks (the single sized ones with 4 knobs on top) or 20 of the square 2x2 Lego bricks.  Keep them in a pot or sandwich bag next to the chart and get your child to add (or remove) a block as earned.


A 'girly' alternative!  

Lego may not float your child's boat.  And if you let your imagination run wild, it doesn't have to be a paper chart at all!  Think of the popular 'Pandora' charm bracelets and you'll realise how much a new bead on a string might motivate a jewelry-obsessed little girl!  Simply reward her with a bead for each positive step toward a target, and take one away for bad behaviour.  Once the required number of beads have been earned she can wear the bracelet with pride (a built in reward!!!!).  You can buy perfect little sets of beads from Melissa & Doug for this purpose:


[ Read More ]

Posted by Maxine Cleminson - - 0 comments

The Big One is a Lego fanatic (see my earlier posts about making a Sensei Wu costume, creating Lego cupcakes and Lego minifig head storage pots). In fact this obsession has been going on since he was the tender age of 3 when we inherited a large box of the stuff from my husband's mother! She had carefully hoarded it since the early 1980s with future grandchildren in mind, and oh boy, are those grandchildren grateful! However, as the Big One approaches his 7th birthday I have noticed that other toy fads are coming onto his radar ... Beyblades in particular. The nice thing is that these battle tops overlap nicely with his collection of Lego Ninjago spinners (I'm guessing these were inspired by Beyblades in the first place?).

So with his birthday coming up, I've been looking at Beyblades and accessories to add to his collection. One thing I was particularly interested in was getting him a battle arena ... not because I have ambitions for him competing in a WBO championship (that's World Beyblade Organization, and nothing to do with boxing by the way!)... rather, I am sick and tired of tripping over spinners and beyblades littering the hard floors downstairs! However, the official Beyblade arenas from Japan are ludicrously expensive... $75+ I was gobsmacked to discover. And the Hasbro Beyblade ones, while available for only $10 in places like Target and Walmart, look very flimsily made out of thin plastic and unlikely to survive my 3 terrors for more than a few minutes! I was also a little disappointed by the quality of the Lego Ninjago Battle arenas which seemed very flimsy for the price.  So I then tried to think of things we could use to create our own.

And that brought me full circle back to Lego. One of the best things about Lego as a toy in my opinion, is the way it fosters creative thinking. The Big One has been designing and making his own Beyblades out of Lego pieces for a while and this inspired me to apply the same principle to creating a Beyblade arena!


You will need...

  • A large Lego baseboard
  • A selection of  Lego  flat tiles
  • A variety of other bricks to create walls, seating, winners podiums, ramps, storage areas and just about anything else your imagination can come up with!
  • Some Lego Ninjago spinners or Beyblades
First of all, as with all Lego creations, there are no hard or fast rules on how to do this.  The Big One and I started out with the idea of creating a flat spinning surface and elaborated from there!  To create the flat surface simply create a tiled surface of Lego flat tiles over a baseboard.  The pick-a-brick section of Lego stores are useful for picking up these rarer elements, but you can also order individual bricks from the Lego website.  We were aiming for a square arena, but this is again up to you, entirely!  It's easiest if you start from the center (or a corner) and work outwards.


To contain the Spinners or Beyblades, we created a raised edge to our flat surface by creating a wall 2 bricks high.


Finally, we created some seating, billboards around the arena and even added a launching ramp and storage areas!  


The great thing about this sort of project is that it's fun at all stages ... from coming up with the concept, through the building process and eventually to the actual game itself.  Plus there is the sense of achievement in having come up with a unique and customisable design of your own!  Much better than a ten dollar bit of flimsy plastic if you ask me!
[ Read More ]

Posted by Maxine Cleminson - - 7 comments

A while ago I stumbled across the most adorable mini Lego head storage jars upcycled from empty baby food jars at the very creative obSEUSSed blog, and they've been on my To Do list ever since.  However, the Big One's birthday isn't until March so I don't really need them for party favors as they are intended and they are a bit small to store many bricks in.  So, when in Target grabbing a few groceries, I was inspired by the shape of a large pot of pistachios!  The plastic pot bears an uncanny resemblance to the iconic shape of a Lego minifig head!  Perfect and a brilliant way to supersize the original idea by Victoria at www.obSEUSSed.com to become a funky and functional storage jar!


You will need...
  • A cylindrical storage jar that resembles the shape of a Lego minifigure head.  Certain brands of baby food are perfect for mini storage pots (or birthday party favors).  The large plastic drums for nuts sold in Target are perfect for bigger versions.  But keep your eyes open, especially at this time of year when large containers of nuts & snacks are on sale for the Holiday season!
  • Yellow spray paint.
  • Sheets of newspaper or cardboard to protect surfaces, and appropriate safety gear/clothing.
  • A black permanent marker or black acrylic paint (and a brush).
  • Optional: white acrylic paint.
  • Optional:  clear spray varnish for durability.

The first thing you will need to do is to carefully wash the containers and remove any labels.  Make sure any sticky residue from the label glue is removed... I use a product called Goo Gone Gel spray for getting rid of stubborn sticky marks and this worked very well for this purpose. Dry the pots carefully, and space them out evenly on a sheet of newspaper or cardboard outside in a well-ventilated area.


After reading the instructions carefully and shaking your can of paint as directed, spray a light, even coat of paint over your jars.  Don't worry if it looks patchy as it's better to do several thin coats, than one thick one that ends up dripping!  Leave 5 minutes between coats (or as long as directed on your spray can) ... I found 2 to 3 coats provided the coverage I needed.  Spray the lids too if you plan to use them.


Leave the final coat for about an hour or so, or until completely dry.  Then you can draw in the Lego minifigures features.  The poster below gives some ideas of faces you could use:


Finally, if you are intending to use the jars for functional storage, you are probably going to need to spray them with a clear varnish to protect your beautiful design!


[ Read More ]

Related Posts Plugin for WordPress, Blogger...