• RSS
  • Facebook
  • Pinterest
  • Twitter
  • Google+
Showing posts with label cakes. Show all posts
Posted by Maxine Cleminson - - 0 comments

It's that time of year again, folks! I'm talking about that time of year when you have a lot of people to buy gifts for to thank for their help throughout the year... teachers, neighbors, babysitters, cleaners etc... The thing is that this can often get expensive and so it is always nice to find a great idea for a relatively inexpensive gift that punches above its weight! This year I have 5 teachers to buy for now that the twins have started school and so things are getting even costlier!

Last year I made a cookie mix in a mason jar to give to the Big One's Teacher as a little gesture of thanks at Christmas... it was a cute little extra to go along with the gift card we gave her! However, the cookies were a one time only gift... once the mix was used that was it. So, I was looking for something that had a bit more longevity! The answer came in the form of the brilliant 1-2-3 cake in a mug mix I made earlier in the year thanks to a Pinterest find. I love this easy mix for its simplicity and relatively guilt-free treat! What better?

To make 5 gifts you will need...

  • 5 x 16 oz (1 US Pint) mason jars ... I bought mine in the Dollar Store!
  • 2 x box mixes of Angel Cake
  • 2 x box mixes of another cake variety (I used Betty Crocker Devil's Food Chocolate cake)
  • 5 x Xmas themed mugs (again from the Dollar Store)
  • 5 x tablespoon measures (again from the Dollar Store)
  • Ribbon in a Christmassy colour
  • Adhesive labels to stick on the jar (see link below)
  • 5 x brown paper gift bag
  • Brown paint
  • Red Paint
  • Black marker

First off, make up the cake mix in a gallon sized freezer bag.  See the details here. Carefully spoon the mix into the jars, shaking to settle if necessary.  Close the lid carefully, and tie a tablespoon measure around the neck of the jar with the ribbon ... tie in a bow. Decorate the paper bag... we made reindeer handprints!

Label the jar with an adhesive sticky label... write the instructions on the label.  You can use the printable attached here with the sticky labels below.


Put it all together in the gift bag with some shredded paper and colored tissue paper!  Et voila!


[ Read More ]

Posted by Maxine Cleminson - - 0 comments

This is just a quick post to share one of my most recent ideas with you... a quick, cheap and easy way to add lights to a cake. I was recently asked to make a fire truck cake for my friend's son's 3rd birthday party and so commenced a bit of an internet trawl for ideas... there really are some amazingly talented cake makers and decorators out there. One fire truck cake in particular caught my eye as the creative Mama who had made it had roped in her Dad to make real working lights for it... brilliant!!! Whilst I admire the ingenuity, I wasn't going to risk electrocuting the party guests with my no-doubt shoddy efforts at electronics.

However, inspiration struck mid-week whilst out trick-or-treating on Halloween. Lots of the kids were wearing glow sticks... as bracelets, necklaces and even just attached to their loot bags! Glow sticks are great... while the liquid and broken glass inside the glow stick isn't something you'd want your child to come into contact with, the exterior is tough and safe for them to play with (as long as they aren't treated with excessive roughness).

A quick rummage in the dollar section of my local Target came up trumps for the fire truck cake. I found a pack of two 4" glowsticks (one red & one blue) that came with attachments and string to make them into pendant necklaces. I was able to use the red one on the top of the cake to resemble the lights on the front of the truck and it looked very effective when the lights were turned out and the candles lit!


This idea could be used in many different ways ... it would be perfect for lightsabres on a Star Wars themed cake! And the fact that glowsticks are available in lots of different colours and sizes (from 1.5" to more than 22") allows for massive creativity!


How would you use glow sticks on a cake?

[ Read More ]

Posted by Maxine Cleminson - - 4 comments

Today is the birthday of long suffering Him Indoors (... Happy birthday, love!) and so I made a cake yesterday for him to take into the office to share with his colleagues!  When I asked the Big One what cake I should make, he replied with the oh-so-helpful "whatever Dad likes best"!  So, I started to consider ideas... and while hubby-dearest may have appreciated it, there was no way I was going to make a Preston North End FC cake!!!  So, another of his passions came to mind... technology!  I am married to a geek... a fellow Geologist and technophile, he's never happier than when faffing with some new gadget or other!  His iPad is a current favourite and with it's sleek form and iconic status was an obvious choice!  So an iPad cake was the choice for Dad... an iDad Cake, if you like!!!


I thought I would blog about the technique I used for this cake as it's become my favourite way of decorating a cake... I used it recently for the Big One's Peregrine Falcon cake!  I am completely useless at piping frosting and get in a right mess, however, I can wield a paintbrush with reasonable accuracy.  Playing to my strengths, I therefore paint my cakes out of choice!

You will need...

  • A cake... I made a large rectangular-shaped Chocolate Guiness cake (it's a recipe from Nigella Lawson's cookbook, "Feast", and it is simply divine)
  • Enough buttercream (or jam) to cover a thin layer over the cake
  • White ready made fondant icing
    sufficient to cover your cake
  • Powdered icing sugar (to dust your board and rolling pin)
  • Rolling pin
  • Sharp knife
  • Powdered edible color pigments, e.g. Wilton's Color Dust
    or food colors specifically designed for painting/stamping, e.g. Wilton's Dab-N-Color
    (normal food coloring runs and isn't quite so successful)
  • Clear vanilla extract or clear alchohol
  • A paintbrush to be used exclusively for food
  • A plate to use as a palette
First of all, you need to cover your cake with fondant icing.  Make sure the cake surface is as level and smooth as possible to give a good finish.  Roll the fondant icing until a 1/4 inch thick and wide enough to cover the cake entirely with an excess (use a fine dusting of icing sugar on your work surface and rolling pin).  Spread a thin layer of buttercream or jam over the surface of the cake (so the icing sticks) and then gently lift the sheet of icing (using the rolling pin to help) and drape over the cake.


Smooth the surface of the fondant icing very gently taking care not to stretch or tear it.  Then using a sharp knife, trim the excess icing so that the cake is fully covered.  Take care not to trim too much... you can always trim more, but if you cut too much off first time, it's nearly impossible to fill the gap discreetly!  I used a ribbon around the base of the cake to hide a few rough edges.  Stick the ends of the ribbon to the cake with a dab of paste made from icing sugar and water.


You can then paint directly onto the surface of the 'blank canvas'.  Alternatively, I cut shapes out of extra pieces of fondant icing and painted these... this gave a slightly 3D effect, but also made for neater edges (especially when using a dark color).  I also used some ready-colored fondant icing in black to cut out the outer edge of my iPad shape.


To paint the cake, you simply need to mix small amounts of the powdered pigment with some clear vanilla extract or alcohol to make a liquid (or use the liquid edible color instead).  I used a small egg cup with the clear alcohol in it and used it to dip my brush in (as if painting with watercolors!).  Mix your colors on a plate to get the shades you need.  From red, yellow, blue, white and black you can create the full spectrum of colors you need, for example:
  • Red + yellow = orange
  • Blue + yellow = green
  • Red + blue = purple
  • Red + white = pink
  • Red + black = burgundy
  • Blue + white = pale blue
  • Blue + black = navy blue
  • Yellow + white = cream
  • Yellow + black = mustard
  • Red + yellow + blue + black = brown
  • Red + yellow + blue + white = beige
Then simply, paint the images you like onto the surface of the fondant icing.  Allow to dry for a few hours and then done!  For my iPad I cut extra small pieces of fondant icing and decorated with the paints and an edible ink marker pen ( I use the AmeriColor Gourmet Food Writer  ones... I then stuck these on with a little dab of water on the back.


[ Read More ]

Posted by Mama Max - - 0 comments

Earlier last week, I posted a few ideas to get your Diamond Jubilee street party planning on the way, including some themed cupcake wrapper printables.  I decided to extend that idea further, and create an easy (and adaptable) cupcake stand to display these little beauties on!  Cupcake stands are very popular at the moment, but are usually quite expensive for what they are!  This one is made from carboard, paper and florists' foam (but you could easily use all recycled materials to keep costs even lower!).  I kept mine relatively simple so as not to detract from the cupcakes themselves and also so that the cupcake stand can be easily adapted for another occasion!


You will need...
  • Cardboard
  • Scissors
  • A ruler or tape measure
  • 3 Cylindrical foam blocks - however, you could use recycled food cans or paper tubes.  I chose 2 taller and narrower ones and a wider, but shorter one for the base.
  • Glue - I find a hot glue gun is the easiest for crafts like this but you can use any multipurpose adhesive
  • Colored paper to match your theme - scrapbooking paper or cardstock is great for this, but you could also use gift wrapping paper.
  • Ribbon - approximately 3 yards depending on the size of your circles!  The width of the ribbon must be thicker than your cardboard, but can be narrow or wide depending on the look you're aiming for.  A wide ribbon can look very effective and would give the illusion of more solid plates.


First of all, you need to cut 3 circles of card in ascending size.  My largest circle was 12" in diameter and the second and third progressively smaller.  I used a variety of plates to draw around to get the right shape.


Glue the circle onto a sheet of colored or patterned paper - I used wrinkle-free gluestick to achieve a smooth surface.  The paper I chose was a fabulous 'velvet' feel paper from a selection of scrapbooking papers in my local craft store ... I felt it was suitably regal for the occasion! :-)


Once the paper is stuck to the circle of card, trim the excess paper with scissors.


Next, cover your cylinders of foam (or recycled cans/tubes) with colored paper... this can be the same paper as the circles, or a contrasting/complementing color or pattern.  I chose a slightly glittery royal blue!


Once all the cylinders & circles are covered with paper you can mark the centers of the bases with a pen, using a ruler.


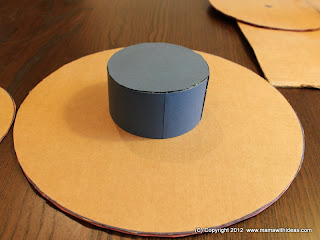
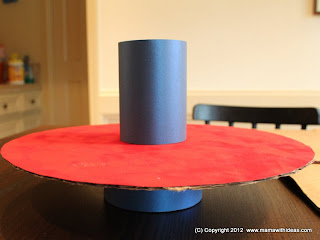
Use these pen marks to help you line up the cylinder and glue into place.  I placed my wide/short cylinder onto the bottom (biggest) circle to create the base of the cupcake stand.  As the foam shed bits of dust, I cut another circle of card to cover the bottom and glued into place.


I then glued another cylinder to the center of the top of the base circle.  One important thing to remember is to line up the line where you have wrapped the paper around the cylinder.  This makes it look so much neater.  Repeat with the final cylinder and circle.


Finally, you need to disguise the edge of the cardboard circles.  To do this, glue a length of ribbon around the edge (hanging down if you have chosen a wide ribbon).


As a final (optional) touch, I decided to add some street party bunting and a Union Jack flag to my cupcake stand.  I have included a free printable at the bottom of this post if you would like to use this!

You will need...

  • the printed bunting and flag sheet (see below)
  • scissors
  • a wooden/bamboo skewer
  • glue
  • cotton thread


Firstly, cut out the larger Union Jack flag, fold in half around a wooden skewer and glue.  Push into the top of your cupcake stand (this is why florist's foam is useful!).


To make the bunting, cut out the diamond shaped double union jack pennants.


Fold in half and line up, evenly spaced.  Lay a length of cotton thread in the crease, and glue the diamond in half to make a triangle.


Glue the bunting around the cupcake stand to decorate!


Click on the preview images below to open the printable .pdf files... they are set up to be printed on standard letter sized paper (8.5"x11").  These printables are provided free on the understanding that they are for personal use only and not to be reproduced, altered or used for commercial purposes (please contact me for more information if necessary)!  Thanks!
[ Read More ]

Related Posts Plugin for WordPress, Blogger...