Earlier last week, I posted a few ideas to get your Diamond Jubilee street party planning on the way, including some themed cupcake wrapper printables. I decided to extend that idea further, and create an easy (and adaptable) cupcake stand to display these little beauties on! Cupcake stands are very popular at the moment, but are usually quite expensive for what they are! This one is made from carboard, paper and florists' foam (but you could easily use all recycled materials to keep costs even lower!). I kept mine relatively simple so as not to detract from the cupcakes themselves and also so that the cupcake stand can be easily adapted for another occasion!
First of all, you need to cut 3 circles of card in ascending size. My largest circle was 12" in diameter and the second and third progressively smaller. I used a variety of plates to draw around to get the right shape.
Glue the circle onto a sheet of colored or patterned paper - I used wrinkle-free gluestick to achieve a smooth surface. The paper I chose was a fabulous 'velvet' feel paper from a selection of scrapbooking papers in my local craft store ... I felt it was suitably regal for the occasion! :-)
Once the paper is stuck to the circle of card, trim the excess paper with scissors.
Next, cover your cylinders of foam (or recycled cans/tubes) with colored paper... this can be the same paper as the circles, or a contrasting/complementing color or pattern. I chose a slightly glittery royal blue!
Once all the cylinders & circles are covered with paper you can mark the centers of the bases with a pen, using a ruler.
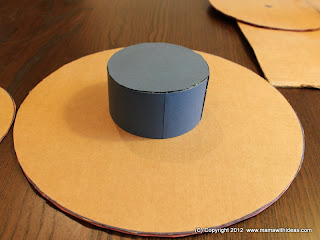
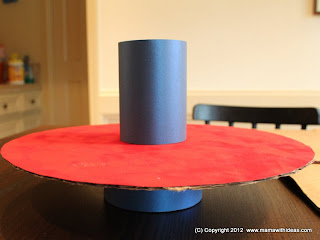
Use these pen marks to help you line up the cylinder and glue into place. I placed my wide/short cylinder onto the bottom (biggest) circle to create the base of the cupcake stand. As the foam shed bits of dust, I cut another circle of card to cover the bottom and glued into place.
I then glued another cylinder to the center of the top of the base circle. One important thing to remember is to line up the line where you have wrapped the paper around the cylinder. This makes it look so much neater. Repeat with the final cylinder and circle.
Finally, you need to disguise the edge of the cardboard circles. To do this, glue a length of ribbon around the edge (hanging down if you have chosen a wide ribbon).
As a final (optional) touch, I decided to add some street party bunting and a Union Jack flag to my cupcake stand. I have included a free printable at the bottom of this post if you would like to use this!
You will need...
Firstly, cut out the larger Union Jack flag, fold in half around a wooden skewer and glue. Push into the top of your cupcake stand (this is why florist's foam is useful!).
To make the bunting, cut out the diamond shaped double union jack pennants.
Fold in half and line up, evenly spaced. Lay a length of cotton thread in the crease, and glue the diamond in half to make a triangle.
Glue the bunting around the cupcake stand to decorate!


You will need...
Click on the preview images below to open the printable .pdf files... they are set up to be printed on standard letter sized paper (8.5"x11"). These printables are provided free on the understanding that they are for personal use only and not to be reproduced, altered or used for commercial purposes (please contact me for more information if necessary)! Thanks!


