• RSS
  • Facebook
  • Pinterest
  • Twitter
  • Google+
Showing posts with label healthy eating. Show all posts
Posted by Mama Max - - 0 comments


I have been on a diet for the last couple of months in an attempt to shift some of the weight I've gained since my overactive thyroid function was 'fixed'.  Whilst Graves' Disease is no laughing matter, it did have the rather delicious side-effect of allowing me to get away with massively overeating without gaining a pound!  If it weren't for all the other nasty side effects it would have been brilliant!  I am now thankfully in remission and have normal thyroid levels which is fantastic... the only problem is that my body is still used to consuming far more calories than I actually need, so I have seen the weight pile on.  However, I decided a couple of months ago that something needed doing so I began a diet... I've lost about 12 of the 20lbs I am aiming to shift, and it's been a bit of a slog if I'm honest.  Nothing dramatic, fancy, potentially dangerous (or expensive)... I've simply reduced my calorie intake to about 1350 a day, eating more nutrient dense food (no empty calories for me) and increased the amount of exercise I am doing.  Booooorrrring.  But there really isn't any quick or easy fix.


But maintaining such a saintly routine is hard work... I'm a strong adherent to the old adage "everything in moderation, including moderation!", because let's face it, there are times when a healthy apple just ain't gonna cut it!  So, I was really pleased when a recent culinary experiment turned out so well!  It made a healthy, nutrient-dense, low calorie treat that was also flippin' delicious!!!!  Whodathunkit!!?


The key to this dessert/treat is having over-ripe bananas.  This makes it doubly brilliant as my kids won't eat brown bananas and I hate to throw them out!  I've blogged before about how brilliant bananas are so you might've guessed I'm a fan!  Oh, and another bonus for those with dairy intolerances (or high cholesterol)... this is a vegan recipe and so is completely dairy free!!!


BANANA CHOCOLATE ICE CREAM (serves 4)

You will need...

  • 3 medium sized bananas, very ripe
  • 1.5 tablespoons of honey (you can use more or less to suit your taste)
  • 3 tablespoons of unsweetened cocoa powder
  • A food processor

Firstly, peel and slice your bananas and spread out on a lined cookie sheet.  Pop the sheet in the freezer overnight so that the banana slices have a chance to get solid.


Put the frozen banana slices in the food processor and set it running.  At first, it will look very lumpy and grainy, but persevere until you end up with a smooth soft ice-cream-like consistency.  Add the honey and cocoa powder and process some more until completely incorporated.  Taste and adjust flavours as necessary.


Pour the soft banana mush into a freezer-proof container, label and return to the freezer to re-harden.


After a few hours (or overnight), the consistency will turn into an ice-cream-like consistency and you can use an ice cream scoop to serve.  Perfect on it's own, or in a wafer cone with some chopped nuts & chocolate sprinkles for a special treat!


This makes enough for 4 servings, but you can scale the recipe up or down depending on the number of bananas you have!


And here's the nutrition information in case you are counting calories like me!!


[ Read More ]

Posted by Mama Max - - 3 comments

I love cake. And I love pinterest.com too as I've blogged about before! So when the latter helped me find a novel, super-quick and low-calorie version of the former, I was in heaven! The pin in question linked to a great blog called The Hidden Pantry written by Diane Cosby. Her recipe for 1-2-3 Cake sounded too good to be true so I thought I'd try it and share the results with you guys!


1-2-3 Mug Cake

You will need...

  • A box of Angel Food Cake mix ... it must be Angel food cake!
  • Any other box of your favourite cake mix ... I chose a Devil's Food chocolate cake mix
  • A large (gallon size) ziploc freezer bag & marker (or airtight container)
  • A tablespoon
  • A microwave safe mug
  • Water
  • Microwave
Simply empty the dry cake mixes into one freezer bag or container and shake to mix.  This can then be stored as is, until you fancy a sweet treat.


To make the cake, grab a mug and tablespoon.  This is where the 1-2-3 bit comes in:

- Add 3 tablespoons of your premixed cake mix powder


- Add 2 tablespoons of water and stir gently until just mixed


- Microwave on high for 1 minute!


Hey presto, a cake!  I served mine with fat free greek yoghurt to be really healthy, but you could add a dollop of vanilla icecream or whatever takes your fancy!


Recipe review
I loved the simplicity and ease of this recipe.  A sweet treat without having to bake a whole cake (and then running the risk of eating the whole thing in one go!).  It was tasty and sweet, but not particularly rich and moist... I guess the absence of eggs and fat would do that!  The texture was very light and I actually had a few large air pockets in mine ... I would guess this came from over-mixing the water and cake mix, so that's worth bearing in mind.  While not my favourite cake ... far too few calories ;-) ... it really did hit the spot in providing a sweet dessert without loading up on the calories and saturated fat and it was literally as easy as pie (well, cake!).  I am delighted with this recipe and look forward to trying a few other mixes in the future!

On a final note, I worked out the nutrition information for those interested, although it's worth bearing in mind that this will vary depending on the cake mixes you use.    


  1. Firstly, you need to work out the total calories for the entire box. If you look at the nutrition label you will see the calories listed for the recommended portion size, but it also tells you how many portions in the entire box.  You simply need to multiply these two numbers together.  
  2. Do this for both boxes and then add together.  That is how many calories in the entire ziploc bag of cake mixes.  
  3. To find out how many calories there are in each mug cake, you need to divide the total by the number of mugs you can make.  I worked out that each cake mix was approximately 3 cups (6 cups in total) and there are 96 tablespoons in 6 cups.  Divide the total number of calories by 96 and then multiply by 3 (or just divide by 32) for the 3 tablespoons you put in each mug! 
Sounds complicated, but it really isn't!  The bottom line is that this mug cake contains approximately 100 calories and only 0.5 grams of total fat ... not too bad in my book!

Oh, and if you are following Weight Watchers, this equates to 2 points (old system) or 3 points (on the Points Plus system!). 

Amount of:
Betty Crocker Super Moist Devil’s Food Cake Mix portion (total = x10)
Betty Crocker Angel Food Cake Mix portion (total = x12)
Totals of mixes combined
1-2-3 Mug cake (per portion)
Weight (dry)
43g (430g)
38g (456g)
886g
28g
Calories
160 (1,600)
140 (1,680)
3,280 calories
103 calories
Total Fat
1.5g (15g)
0
15g
0.5g
            -  Saturated Fat
1g (10g)
0
10g
0.3g
Cholesterol
0
0
0
0
Sodium
360mg (3,600mg)
310mg (3,720mg)
7,320mg
229mg
Total Carbohydrates
35g (350g)
32g (384g)
734g
23g
            - Dietary fiber
1g (10g)
0
10g
0.3g
            -  Sugars
18g (180g)
23g (276g)
456g
14.25g
Protein
2g (20g)
2g (24g)
44g
1.4g

[ Read More ]

Posted by Maxine Cleminson - - 0 comments

One of the biggest challenges in feeding a child is to combine your knowledge of healthy foods with the task of actually getting your child to eat it!!! Young children are notoriously fussy eaters and to get them to eat a varied, healthy, balanced diet is often difficult. So I thought it was about time I shared one of my most successful child-friendly recipes... an adaptation of the humble fish finger!

Like many children, my brother & I grew up on fish fingers... the bright orange crispy breadcrumbs and the flaky white fish inside... yummy! They were probably not the healthiest dinner out there, especially when served with deep fried potato chips, but in terms of kid-satisfaction Mum always got the thumbs up from us! So when the Big One graduated onto big-boy meals I looked out the frozen fish finger in the supermarket. There seemed to be a lot of variation in quality, with some of the cheaper brands not even able to specify the type or part of the fish in question. However, some of the nicer ones were clearly labelled '100% fillet' and used paprika rather than artificial colouring to achieve the traditional golden coating. So it wasn't long before the Big One became hooked and a fish finger supper became a regular serving on the menu.

However, when we moved to Texas from the UK we were stumped. The equivalent over here are called 'Fishsticks' and they are much less popular. Consequently, there is little variety in the brands & types available. Most that I have come across are made with 'minced white fish', and instead of breadcrumbs they are coated with batter. So rather than settle for second best, I decided to make my own ... how hard could it be, right? Easy peasy is the answer and they are far more delicious than any store bought ones too!  I find it best to prepare a large batch ahead of time and then freeze uncooked. They can then be cooked from frozen in about 15 minutes for a quick, nutritious meal.


Over time, I have adapted the recipe to incorporate healthier ingredients, especially key foods for brain development in infants and children (and for maintaining brain health in adults). My grandfather died of Alzheimer's disease a few years ago and so I am very aware of the importance of feeding this key organ right!

Antioxidants - foods with antioxidant vitamins and minerals act in a way to protect the brain & body from wear & tear! Basically, as you breathe your cells react with the oxygen absorbed and some highly reactive molecules called free radicals are produced.  These free radicals can interact with other molecules within your cells and can cause damage to proteins, membranes and genes. Antioxidant molecules help prevent the oxidation process and therefore reduce potential cell damage. Foods high in antioxidants include fruits & vegetables, especially those with bright intense colours (e.g. berries & dark green leafy veg). However, beans, nuts & seeds are also packed with antioxidants such as Vitamin E.


Choline - this is a nutrient essential to healthy brain function and memory. It is especially important for pregnant & nursing mothers to make sure they have enough choline-containing foods in their diet as studies have shown that this nutrient is key to fetal/infant brain development. Luckily it's present in quite a few foods (such as broccoli, beans, cauliflower, tofu and lean beef), but the best source of choline is eggs, specifically the yolks!


Omega 3 Essential Fatty Acid - this is a well known key nutrient for good brain health. However, they are also crucial for eye development and help stabilise moods. Oily fish, nuts & seeds are the best sources of Omega 3.


Complex carbohydrates - these fiber-rich grains & starches are the fuel of the brain! Unlike refined starches (like those in white bread, white rice, sugar etc...) the energy from fiber-rich foods is released slowly and steadily over time! Whole grained bread, pasta, rice etc... is best!


Brain Boosting Fish Fingers
For approximately 48 brain-boosting fish fingers, you will need...
  • 1lb salmon fillet (or you could substitute with trout or any other oily fish)... make sure that it has not been previously frozen if you plan to make these to freeze for future use - Omega 3 fatty acids & choline
  • 1 cup wholewheat breadcrumbs - Complex carbohydrates
  • 1 cup ground flax seeds (called linseed in the UK) - Complex carbohydrates, omega 3 fatty acids & antioxidants
  • 2 tablespoons buckwheat flour  (you can substitute regular wholewheat flour) seasoned with a small amount of salt & pepper if desired - antioxidants & complex carbohydrates
  • 1 or 2 beaten eggs - Choline & Omega 3


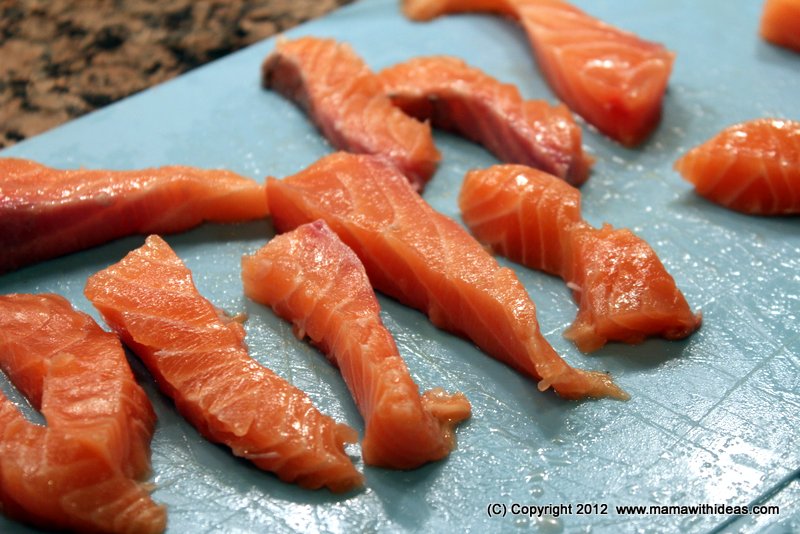
Remove the skin from your salmon fillet (lay the fish skin side down, use a sharp knife to make a slit in the flesh at the thin tail end, hold the skin tightly and then cut  along the skin at a 30' angle to the board).  Check to make sure there are no small bones... the easiest way to do this is to run your fingers over it.  Then cut the fillet into strips approximately 3/4" wide and 2-3 inches long... unlike shop-bought fish fingers, uniformity isn't necessary!


Line a baking sheet with baking parchment.  Then assemble your ingredients for breadcrumbing the fish.  I've blogged about the best method for coating things in breadcrumbs before when describing my Mum's Leftover rissoles, but the key is to get organised with your plates of fish, flour, egg, breadcrumbs and the lined tray to freeze them on in advance.  And then remember to keep your hands assigned to wet & dry roles!


Roll the fish strips in the flour.  To prevent you getting in a sticky mess, use only your 'dry' right hand for flour.


Then dip the fish in the egg - only using your 'wet' left hand.


Then roll the fish in the breadcrumbs - using your 'dry' right hand.  Place the finished fishfinger on the lined tray.


Open freeze the fishfingers and then transfer into a ziploc freezer bag or container, labelled with details of contents.


To cook, simply shallow fry in oil over a medium-high heat turning occasionally until golden and crispy on the outside and fully cooked and pale pink within.  Drain on kitchen paper before serving.  They can also be oven cooked... place on a lightly oiled baking sheet, brush or spray with a little olive oil so the breadcrumbs go crispy and then bake at 375'F (190'C) for approximately 15-20 minutes (again, check they are fully cooked before serving).


Serve with antioxidant-rich vegetables such as asparagus, carrots, broccoli & sweetcorn, and a portion of skin-on oven baked potato wedges or steamed new baby potatoes for a healthy, balanced, quickly prepared, and most important child-approved dinner!


[ Read More ]

Related Posts Plugin for WordPress, Blogger...