


Butter. Mmmmmmm. On warm toast. Divine.

Making my own butter is something I've wanted to try for ages, especially because it's so EASY! So I decided to try it out today with the twins' help! The result is light and creamy, golden butter and a small pat of heaven to enjoy on toast for lunch!
You will need...
- Heavy whipping cream (or double cream in the UK)
- Something to churn the butter ... this can be a food processor, electric mixer or even an empty (clean) jam jar and lid with an optional marble inside!
- A pinch of salt and some fresh herbs (optional).
When raw (unpasteurised) milk is left to stand, it separates into low fat (skimmed) milk and cream. The cream has proteins and fats in it. When you shake the cream, all the fat globs stick together and make butter. The liquid part that separates out has the proteins, and that’s the buttermilk (this should not be considered a waste byproduct as it's a fabulous ingredient in itself!). Simple.
So all you need to do is agitate cream sufficiently so that the proteins and fats separate and hey, presto! Butter and buttermilk! Many of you will have probably done this accidentally by over-whipping cream until it goes a bit grainy. At the time, when your Eton Mess was awaiting it's creamy finishing touch, you probably considered this a disaster... but it certainly isn't that! What you are beginning to see is the fat coming together to form butter!
Raw, unpasteurized cream is best for making butter. Unfortunately, it's virtually impossible to source raw, unpasteurised milk or cream here in Texas unless you go to a specially licenced dairy and buy from them directly. The Real Milk organisation is very handy to help you source raw milk in your area. As a second best you can sometimes source cream that has only been slightly pasteurised at a lower temperature. However, most grocery stores only sell ultra-pasteurised cream (often containing carrageenan... a seaweed extract added to increase viscosity). You can still make butter with this, but for superior results you should try to get the previous types. You should also go for the best quality you can get... the taste of your cream will directly influence the taste of your butter. Thank you, Captain Obvious! I was only able to buy ultra-pasteurised cream in my local store, so made do with the better quality Organic cream.
To make the butter (and buttermilk) simply churn your butter using your chosen method. Bear in mind that it can take a while depending on how fresh your cream is and the method you are using. It can take up to half an hour by shaking it in a jam jar so be prepared for arm ache! I used the time-and-labor-saving food processor. Below is a series of photographs taken at one minute intervals to show the stages the cream goes through.
After 1 minute - the cream is very frothy but still runny.

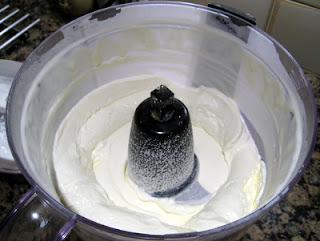
After 2 minutes - the cream has a perfect whipped texture.
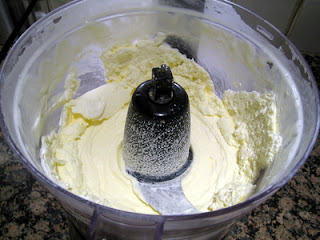
After 3 minutes - the cream is a slightly yellow colour, and has started to become a little grainy.
After 4 minutes - the food processor starts to sound different as the mixture changes consistency. The cream has clearly separated into lumps of fat and a milky liquid.

At this point, carefully drain the buttermilk into a jug... this is a great ingredient and can be used in loads of yummy recipes, so watch this space for some ideas! Then, bring the lumps of butter together into a ball. You are then entitled to admire your pat of butter and think smugly to yourself... "Holy cow, I just made my own butter!"


There will still be a lot of buttermilk within the butter pat and this will make your butter go rancid quickly if left, so the solution is to wash your butter in ice cold water. Place the butter in a bowl of water and knead carefully. Change the water frequently, until the water runs clear. You are traditionally supposed to season your butter with salt (if required) before churning, however, because of the rinsing required I decided to do this after. Just a small shake of sea salt is needed initially - remember you can add more if needed, but can't take it out! Knead it into the butter and then transfer into a small ramekin or dish, cover carefully (butter absorbs odors) and store in the refrigerator for up to 2 weeks (yeah, like it'll last that long!). You could add some freshly chopped herbs to your butter if you like... I'm thinking of doing that with half my butter later!


In terms of yield, from 2 cups of cream, I made approximately 1 cup of butter (approximately 8oz/225g) and 1/2 cup (120ml) of buttermilk - I guess the other 1/2 cup of buttermilk was washed out during the rinsing process.

Such an easy project and a definite one to remember when there is leftover cream in the fridge!

So all you need to do is agitate cream sufficiently so that the proteins and fats separate and hey, presto! Butter and buttermilk! Many of you will have probably done this accidentally by over-whipping cream until it goes a bit grainy. At the time, when your Eton Mess was awaiting it's creamy finishing touch, you probably considered this a disaster... but it certainly isn't that! What you are beginning to see is the fat coming together to form butter!
Raw, unpasteurized cream is best for making butter. Unfortunately, it's virtually impossible to source raw, unpasteurised milk or cream here in Texas unless you go to a specially licenced dairy and buy from them directly. The Real Milk organisation is very handy to help you source raw milk in your area. As a second best you can sometimes source cream that has only been slightly pasteurised at a lower temperature. However, most grocery stores only sell ultra-pasteurised cream (often containing carrageenan... a seaweed extract added to increase viscosity). You can still make butter with this, but for superior results you should try to get the previous types. You should also go for the best quality you can get... the taste of your cream will directly influence the taste of your butter. Thank you, Captain Obvious! I was only able to buy ultra-pasteurised cream in my local store, so made do with the better quality Organic cream.
To make the butter (and buttermilk) simply churn your butter using your chosen method. Bear in mind that it can take a while depending on how fresh your cream is and the method you are using. It can take up to half an hour by shaking it in a jam jar so be prepared for arm ache! I used the time-and-labor-saving food processor. Below is a series of photographs taken at one minute intervals to show the stages the cream goes through.
After 1 minute - the cream is very frothy but still runny.

After 2 minutes - the cream has a perfect whipped texture.

After 3 minutes - the cream is a slightly yellow colour, and has started to become a little grainy.

After 4 minutes - the food processor starts to sound different as the mixture changes consistency. The cream has clearly separated into lumps of fat and a milky liquid.

At this point, carefully drain the buttermilk into a jug... this is a great ingredient and can be used in loads of yummy recipes, so watch this space for some ideas! Then, bring the lumps of butter together into a ball. You are then entitled to admire your pat of butter and think smugly to yourself... "Holy cow, I just made my own butter!"


There will still be a lot of buttermilk within the butter pat and this will make your butter go rancid quickly if left, so the solution is to wash your butter in ice cold water. Place the butter in a bowl of water and knead carefully. Change the water frequently, until the water runs clear. You are traditionally supposed to season your butter with salt (if required) before churning, however, because of the rinsing required I decided to do this after. Just a small shake of sea salt is needed initially - remember you can add more if needed, but can't take it out! Knead it into the butter and then transfer into a small ramekin or dish, cover carefully (butter absorbs odors) and store in the refrigerator for up to 2 weeks (yeah, like it'll last that long!). You could add some freshly chopped herbs to your butter if you like... I'm thinking of doing that with half my butter later!


In terms of yield, from 2 cups of cream, I made approximately 1 cup of butter (approximately 8oz/225g) and 1/2 cup (120ml) of buttermilk - I guess the other 1/2 cup of buttermilk was washed out during the rinsing process.

Such an easy project and a definite one to remember when there is leftover cream in the fridge!


Also so good on homemade scones!!! Thanks again for today - Isla & I had a wonderful time :)
Great ideas -- love this. I've been itching to try homemade butter - but I think you've pushed me over the top with buttermilk!!
Love making my own butter too, great step by step and information. I was the lucky customer of some raw milk a few weeks ago, oh man was it good. Wish I had a dairy farm in my backyard!
Thanks for linky up to my very first Recipe Linky! Hope to see you back next week.
I have a question for you. Have you tried using the butter you made for baking? Just curious if it works the same or if the texture is different and doesn't work well in baked goods! Looks fun though!!
Stopping by via Newlyweds recipe linky!
Hi Willa! Thanks for stopping by and sorry to have taken my time in replying ... I was off cub scout camping this weekend with the Big One! I haven't tried it in baking but I am confident that it would work exactly the same as it has the same texture and (better) taste as the butter you buy in the store! If you do try it out, let me know how you get on!
Mx