


The Big One has been Star Wars mad since the tender age of 3 and a half when Him Indoors & I were exhausted with newborn twins and looking for a movie to occupy our eldest whilst we got a well-deserved sit down on the sofa! A quick flick through our DVD collection yielded 'Star Wars Episode IV: A New Hope'... and (as they say) the rest is history! A few short months later the obsession had progressed so much that the Big One asked for a Star Wars themed 4th birthday party! Pinatas were a relatively new arrival to the party scene in the UK so I decided to make my own. Surprisingly, they are very easy to make and you can even adapt them (as I did) to be more suitable for pre-schoolers with a pull-string to open them rather than the potentially dangerous blindfolded stick-busting more common with pinatas stateside! I was really pleased with the way my R2D2 pinata turned out and have been meaning to post about it for a while... however, as this is from the archives of my pre-blogging days I don't have photos to show you how I made it (sorry)! So, I have taken the time to draw instructions in a step-by-step guide which also includes the printable decorations I made for mine... if you scroll to the bottom of the post there is a link to a .pdf file that contains everything in one easy to print guide (please note that I am sharing this for personal use only)!

You will need..
- 1 x round balloon
- 2 x long thin modelling balloons
- 2 x large sheets of poster paper or card
- Sticky tape
- Scissors
- Two small card boxes
- Newspaper cut into strips
- Craft glue
- Pipe cleaner or wire coat hanger
- White paint & paintbrush
- White crepe paper
- Silver crepe paper
- Black crepe paper
- Curling gift ribbon
- Candy/treats
- Empty plastic bottle cap
- Printouts from these instructions


Step 2: Inflate two long modelling balloons until they are approximately twice the height of the cylinder long, and then tie the ends together to make two large loops.
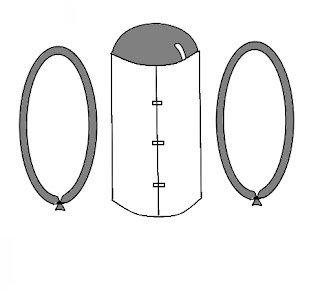
Step 3: Carefully squash the loop of balloons into R2D2 leg shapes and fix onto either side of the body with tape (you may have to use strips of paper taped to the body if the tape makes your balloons pop!).

Step 4: Make R2D2's feet from two small cardboard boxes and tape into place over the bottom of the legs.

Step 5: Paste strips of overlapping newspaper all over the balloons and body with a mix of craft glue and water to make papier mache. Allow to dry completely (usually overnight).

Step 6: Once the papier mache is dry you can pop the balloons inside with a pin if you like. Use a pipe cleaner or wire coat hanger to create a hook in the top. Then paint the entire thing white to stop the newsprint showing through. Allow to dry.


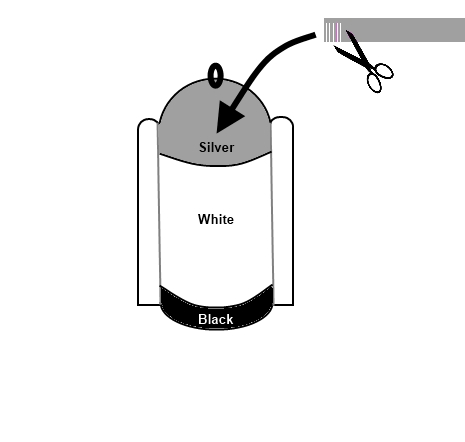
Step 9: Now to decorate R2D2, you will need to cut strips of crepe paper approximately 2" thick and make cuts to create a fringe. Layer these fringes of crepe paper starting at the bottom and working towards the top. Put a layer of black fringing on the bottom of the cylinder to create the impression of a gap underneath R2D2's body. Then white fringing all over the body & legs. Finally, silver or grey fringing over the dome of his head.

Step 11: Open the trap door and fill the interior with individually wrapped candies and small treats ... be careful to keep the weight realistic! Push the trap door shut, but do not glue or tape shut.


Step 13: Finally, decorate the outside of R2D2 by cutting out the shapes on the printable below. You can also use an empty plastic bottle cap to glue on for R2D2's camera (see the photo below to see what I mean)!


Step 14: Hang R2D2 by the hook on the top and then at the party, the kids can take turns to pull one of the strings until the lucky winner pulls the one attached to the trap door! If you would rather make this a traditional pinata that needs busting open with a stick, just don't bother cutting the trap door or attaching the ribbons to the base!

Click on the preview image below to open the printable instructions and cut-outs...

Enjoy... and may the force be with you!
Love it, my son asked for this piñata for his 4th birthday, I mention it to my mother in law, that maybe I was going to try to make it, she laughs of me...
So now, it's a challenge!, because she laughs and because I am Mexican, we invent piñatas!
Thanks!!!!
Thank you so much for this tutorial! My five year old is going to lose it when he sees it at his party Saturday! (Yes, his Star Wars birthday party is on Star Wars Day - "May the 4th Be With You" - completely coincidental sad to say!)
I am almost done and to the point of applying the decals. I was just unsure of how to decorate the sides of the legs and back? Which decals go places other than the front of the piñata?
Thank you so much again!
Michelle in Texas
I used this idea to make pinata for my friends son's birthday. He was delighted! Thanks!!!