• RSS
  • Facebook
  • Pinterest
  • Twitter
  • Google+
Posted by Maxine Cleminson - - 0 comments


We are going to a friends' Halloween party this afternoon and as it's a potluck I had to come up with a spooky dessert idea to feed lots of people. I'd also recently bought a lovely glass trifle bowl that has been crying out to be used. So, I decided to adapt a cupcake theme I'd seen in Clare Crespo's book, "Hey There, Cupcake!".

The resultant masterpiece is a spook-tacular Buried Alive Trifle!


You will need... 
  • Your favorite trifle (homemade or even shop bought would do!).
  • Chocolate biscuits (Oreos for the US lot, maybe Bourbons for those in the UK)
  • Green cake sprinkles (optional)
  • Gummy worms (optional)
  • A sacrificial doll (or doll arms from a craft shop... apparently you can buy body parts by the bag load)
  • Craft foam in beige or grey
  • Clear or black straws (or wooden skewers)
  • Black & grey marker pens
  • Scissors.
Firstly, you will need to either make or buy a trifle.  I made mine with the following layers: strawberry jell-o with strawberries, blueberries and graham crackers; then homemade custard with bananas and strawberries; then a layer of sticky caramel (dulce de leche); and finally, a layer of whipped heavy (double) cream.


To create a graveyard scene on the top, simply crush up some Oreo biscuits in a plastic freezer bag, using a rolling pin.  Sprinkle the crushed biscuits on top to look like dirt.  You can add gruesome additions such as gummy worms for an extra ick factor.  I also used green cake sprinkles to hint at grass around the edges of the dish.


Then you need to create your buried alive victim.  I bought a $3 doll from our supermarket and sacrificed her arms for the greater good!  However, I believe it is possible to buy just the body parts you require from craft suppliers.  I carefully washed and dried her arms before inserting into the top of trifle.

Finally, you will need to create a tombstone.  I used beige craft foam which I cut into an arched shape and colored using grey and black permanent markers.  Add the name and dates of your victim, and the obviously unheeded R.I.P.  To fix into your trifle you can use drinking straws.  I made an inch long slit in the bottom of straws and slid them onto the tombstone.  Once the top of the straw is trimmed you can then push the straws into the top of the trifle to keep the tombstone upright.  If you don't have clear or black drinking straws you could try using skewers.


I also created a label for the front of my dish using the same craft foam and pens.  I copied a spooky Halloween font to give an extra spooky factor!


Enjoy!  And happy Halloween to everyone!
[ Read More ]

Posted by Maxine Cleminson - - 0 comments

I am the proud owner of two very fussy eaters. The Big One, despite being skinny as a rake, will eat most things I put in front of him with gusto! However, the Shouty One and the Chubby Cheeks One are both notoriously fickle. I posted a breaded rissoles recipe recently, and in that described the battles we have trying to get them to eat anything not covered in breadcrumbs. Thankfully, sandwiches are a bit of a winner, but I'm getting tired of the plain jam, ham, cheese routine (they won't even entertain the idea of a bit of mayo or salad to brighten these up!). So I thought I'd have a go at ringing the changes in line with a current obsession of theirs... Cars the Movie(s)... and make a Lightning McQueen sandwich!


I'd been inspired by the Funky Lunch book... an amazing book with fantastic ideas to make your everyday lunches a bit... well, funkier! The one that caught my eye was for the Mater Sandwich shown below! Awesome, eh?!  However, the terrible twin-some are obsessed with Lightning McQueen himself, so I set out to recreate the Piston Cup winner in bread and ham glory!


You will need:

  • Sliced bread
  • Red food coloring
  • Milk
  • Butter
  • Sandwich filling of your choice
  • Blueberries, black olives, raisins, prunes or a 'black' food alternative.
  • Sliced chicken deli meat, turkey, white cheese, egg, apple slices or 'white' food alternative.
  • Yellow cheese, yellow bell pepper or 'yellow' food alternative. 
The first challenge to overcome is that Lightning McQueen is bright red.  And bread is not.  However, don't be deterred by this as it's possible to paint bread!  In a small bowl, mix approximately 4 tablespoons of milk with red food coloring.  If you prefer to be a bit crunchy you could use beetroot juice instead, and I guess the results would be just as vivid.  Then with a brush (I used a silicone pastry brush), carefully paint the surface of the bread being careful not to over-wet it!


    You will then need to lightly toast the bread to dry out and set the food colouring.  You can do that in the oven or in a bread toaster.  Once done, create a sandwich with another slice of bread and fill with whatever filling your child loves best.  It sounds obvious, but make sure the colored side of the bread is facing outwards.  I made ham sandwiches for my two!  Then cut a Lightning McQueen car shape out of the sandwich.  I created a paper template first and this made it much easier.


    Then, it's just a case of decorating the top of the sandwich with appropriately colored/shaped foodstuffs! 

    • For the whites of the eyes and mouth, I used thinly sliced chicken deli meat.
    • For the black parts of the eyes and the wheel hubcaps I used blueberries.
    • For the wheels I used bits of the bread crust I had removed, although I would have liked to have used prunes (but the cupboard was bare!).
    • For Lightning's bolt, I used a slice of yellow cheddar cheese.

    You may need to stick the decorations to the top of the sandwich, and a tiny smear of butter will do the trick!


    As you can see the Shouty One was pretty excited at the getting to watch, play, sleep and now eat Lightning McQueen!


    As an aside... the Big One was pretty adamant that he was "too grown-up" for a Lightning McQueen sandwich, but as I had already painted his bread red, we had a quick brainstorm for an alternative.  I was all for another foray into Angry Birds territory after my recent success with Angry Birds Pumpkins, but he decided to go with a local wildlife treasure... the Red Cardinal!


    [ Read More ]

    Posted by Maxine Cleminson - - 0 comments


    You can't quite beat a gin & tonic, over ice with a slice.... or at least that's what I thought! So when browsing through a book by English chef & writer Annie Bell called 'Gorgeous Cakes', I was delighted to discover a recipe called Gin & Tonic Minis. After my recent success with Nigella Lawson's Chocolate Guiness cake at the twins' birthday party (I should point out that this was for the grown ups ... the kids had alcohol-free cake pops!!), this set me off on a daydream about a whole range of cocktail cakes! I envisioned Malibu & pineapple muffins, Rum & coke cupcakes, Vodka & tonic cheesecake.... mmmmm! So after a quick perusal through my stash of booze (Him Indoors & I are not big drinkers of spirits so most of what we have has been donated by expat friends departing the country!), I came up with a bottle of Tequila and Margarita mixer!

    I had seen several recipes online for Margarita cake in the past, but every single one included a box of cake mix! I'm a bit of a purist when it comes to my cakes... not that I don't have the odd Betty Crocker packet stashed in my pantry ... I just prefer to make my cakes from scratch! So I set to work to create my own recipe based on a light and fluffy Angel Food cake (not to be confused with the pink, yellow & white layered Angel Cake of the UK).


    You will need...

    • A mini-muffin or small cupcake pan (this recipe yields about 24 mini cupcakes).
    • Paper or silicone cupcake cases to fit your pan.
    • 2 medium egg whites.
    • Pinch of salt.
    • 1/4 teaspoon cream of tartar.
    • 60g (1/2 cup) of powdered icing sugar, sifted.
    • 35g (1/4 cup) of all-purpose plain white flour, sifted.
    • 1-1/2 tablespoons of your preferred Margarita Mix.
    For the topping you will need...

    • 115g (1 stick) unsalted butter, at room temperature.
    • Approx. 225g (2 cups) powdered icing sugar.
    • Juice of half a small lime, freshly squeezed.
    • 2 teapoons Tequila (optional.. add juice of other half of lime instead if you prefer non-alcoholic)
    • Zest of small lime.
    • Tiny pinch of salt.
    • Tiny drop of green food coloring, paste or liquid.
    • Small slices of lime for garnish (or you could use candied limes).
    • A piping bag (optional).


    Some alternative cocktail cake suggestions:
    1. Rum & Coke cupcakes
    2. - Replace the Margarita mix with Coca-cola in the cake mix, and the Tequila with Rum in the frosting.  Omit the lime juice and green food coloring, and decorate with Gummy Cola Bottles!
    1. Malibu & Pineapple cupcakes
    2. - Replace the Margarita mix with pineapple juice in the cake mix, and the Tequila with Malibu.  Replace the lime with pineapple juice in the frosting and tint to a pale orange color instead of green.  You could decorate with candied pineapple.
    1. Gin & Tonic cupcakes
    2. - Replace the Margarita mix with tonic water in the cake mix, and the Tequila with Gin in the frosting.  Replace the Lime juice with Lemon juice and decorate with a slice of lemon instead.


    Preheat the oven to 340'F (170'C or adjust if you have a fan oven).  Carefully seperate the egg whites into a large bowl taking great care not to break the yolks.  Using a handheld electric mixer, whisk the egg whites with the salt & cream of tartar until they are fluffy (you're aiming for soft peaks rather than stiff!).  Next, whisk in the sugar a tablespoon at a time (whisk for about 20 seconds after each addition).


    You will then need to add the flour (one third at a time) and very gently fold in with a spoon, being careful not to knock out the air that you have added by whisking... remember ... light & fluffy!!!  Finally, gently fold in the Margarita Mix.


    Arrange the paper cupcake cases in the mini-muffin pan and then fill each one with the cake mix.  It won't rise much as it already has the air added in the meringue-like texture so you can fill each one almost to the top.  Bake the cakes for 10-15 minutes until lightly golden on the surface and springy to touch.  Remove from the oven and leave to cool in the pan.


    To prepare the frosting, you will need to use the electric mixer again so quickly wash the beaters.  Then in a large bowl, beat the butter until soft and creamy.  Add the powdered sugar a 1/4 of a cup at a time and beat in well.  Don't worry if it looks too dry at this stage.  Add the pinch of salt, zest and juice of the lime and the Tequila if you are making the boozy version!  Beat until a smooth buttercream texture.  Then add a tiny bit of the green food coloring and beat in until you achieve a pale green Margarita color.  You can top the cakes using a palette knife or a piping bag.  A small slice of lime to garnish finishes the cupcakes off nicely!


    And sit back and enjoy with an ice cold Margarita!!  Delicious!


    Tempt my Tummy Tuesdays

    Strictly Homemade Tuesday


    [ Read More ]

    Posted by Maxine Cleminson - - 5 comments

    or could also be titled... "Pimp my Pumpkin!".

    My husband, Him Indoors, has been a bit obsessed by the amazing pumpkin carvings you see online!  So I thought I'd have a go at immortalising him in squash ready for the upcoming Halloween festivities.  This is for him... love you, hun!


    Don't be put off if you think you're not very artistic as it's suprisingly straightforward to do once you have edited your photograph properly!

    You will need:
    • A decent digital photograph, preferably one where the subject's features are somewhat shadowed so there's a good contrast between light and dark.
    • A software program that allows you to edit photos.  I used Paint.net, a free downloadable photo editing software for computers running on Windows.  However, there are loads of similar applications that can be used to equal effect.
    • A printer & paper.
    • Tracing paper or baking parchment.
    • A stapler.
    • A soft pencil.
    • A sharp knife.
    • A spoon.
    • A pumpkin.
    • A candle.
    So I started with a great picture of Him Indoors and opened it in Paint.net.  The first thing I did was to remove the sky background as it was too similar in contrast to his head... if your subject's face has a contrasting background you will probably not need to do this step. To do it I used the 'Magic Wand' tool, set at 50% tolerance.  I clicked on the sky behind his head to select it and then deleted those areas.


    I then used the 'Paint Bucket' tool, with the color black selected to repaint the sky black.  This provided a greater contrast between Him Indoors' face and the background.  I also used the 'Rectangle Select' tool to select the area of the photo I was focusing on, and then clicked on the 'Crop to selection button.  This removed the parts of the photo I didn't need.


    Then I clicked on the top menu 'Adjustments', scrolled down and selected 'Black & White'.


    Next, I clicked on the top menu 'Adjustments' again, this time scrolling down to 'Brightness/Contrast'.  By increasing the contrast to maximum and the brightness slightly up, the image became simply black and white with no shades of grey.


    Then I clicked on the 'Paintbrush' tool, again with black and setting the paintbrush size to 50.  I was then able to paint over the extra white bits that weren't needed.  The aim is to have a very simple image to carve.


    To save ink when printing, I inverted the image (basically switched the white & black areas).  I did this by clicking on the 'Adjustments' menu, and selecting 'Invert Colors'.  Finally, I clicked on the menu 'Effects' at the top, and selected 'Blur', and then 'Median Blur'.  I set the radius setting to 10 with a 50 percentile.  This again simplified the image, removing unnecessary detail.


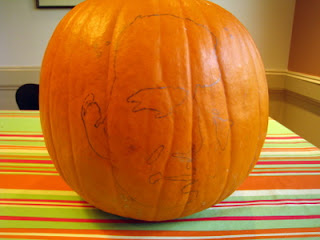
    Once the image was printed to the appropriate size (use the printer options to scale the image to fit your paper).  I then had to use the template to get the design on the pumpkin.  To achieve this, I used tracing paper and a soft graphite pencil.  I stapled a piece of tracing paper to the back of the printout.  It's important to do this so that your image isn't flipped when you transfer the tracing onto the pumpkin.  I then held the paper to the window and traced around the outline onto the tracing paper.


    Then when I had completely traced the outline of the image, I pinned the tracing paper to the pumpkin with dressmaking pins (making sure the pencil outline was touching the pumpkin skin).  Using my pencil, I gently drew over the back of the image so that the pencil outline was transferred onto the pumpkin.


    Then using the sharp knife I gently cut away the surface of the pumpking skin in the areas that were black on my original printout.  Once completed, I hollowed out the inside of the pumpkin with a spoon, being careful not to break through the surface where I had carved the design.  A candle inside the pumpkin revealed the image to it's full potential!


    It's a Blog Party


    newlyweds-blog.com


    Strictly Homemade Tuesday
    [ Read More ]

    Related Posts Plugin for WordPress, Blogger...